I need some pointers on the best workflow to get through my predicament.
I have a client that is providing architectural models from Chief Architect. They are exporting to STL.
My problem is that these models contain the whole house, including all interior walls, furniture, etc. The client wants an external model without the extra interior detail. Since the window panes have a glass property assigned to them, they are always stripped when repairing via NETFABB or other tools, leaving holes into the interior.
When I receive the model I am first opening in Meshmixer to look for any loose surfaces that can be cleaned up quickly. I am also “closing the windows” by selecting the glass pane polygons and extruding across the window surface to create a complete outer shell. I then move over to NETFABB to repair the STL and make manifold.
Now comes my frustration… I have yet to find an easy way to select just the outer shell of the model, and ignore all the details of the interior (floors, ceilings, walls, doors, furniture, appliances, etc.).
-I have tried “shrinkwrapping” through PTC Creo - that leaves unsightly creases and loses detail.
-I have tried selecting just the outer surface in Meshmixer manually and splitting to a different layer - this is very time consuming (2 hrs for a small house) due to all the tiny surfaces around window trim, etc.
-I have tried doing Boolean operations trying to subtract my house from a cube, in “you name it” modeling programs (I’ve downloaded and tried literally every program that shows up on forums and google searches!)… the issue is that if it does not fail, it doesn’t stop at the exterior surface… I am still left with all the negatives of the interior that I still need to clean up.
-I have tried ZBrush dynamesh- this has been the most promising option but I have no experience with Zbrush. The result is more or less what I’m looking for, but there are still some issues losing hard edges and detail… if I crank up the resolution then my file size gets gigantic.
So my question… Is there something easier??? Am I onto the right trail with Zbrush? If so can I have some pointers? Can I import to Zbrush and just select the outside shell easily then export to STL from there?
There must be an easier way!! Please help!! My wife thinks I’m crazy… I’ve spent about 20 hours this week trying to figure this out by myself… finally giving up and asking for help!
Does the “Separate Shells” command in MeshMixer see the interior and exterior surfaces as being separate shells? If so, you could run that and delete each of the shells that’s part of the interior. After that, you’d “just” have to fill the holes at the windows. But I would guess that MeshMixer’s AutoRepair should do a pretty good job of that if you’ve gotten all of that extraneous geometry out of the way.
If the model is watertight, NetFabb (unfortunately, not the free version) has a “remove shells with negative volume” function that will delete everything inside the exterior shell.
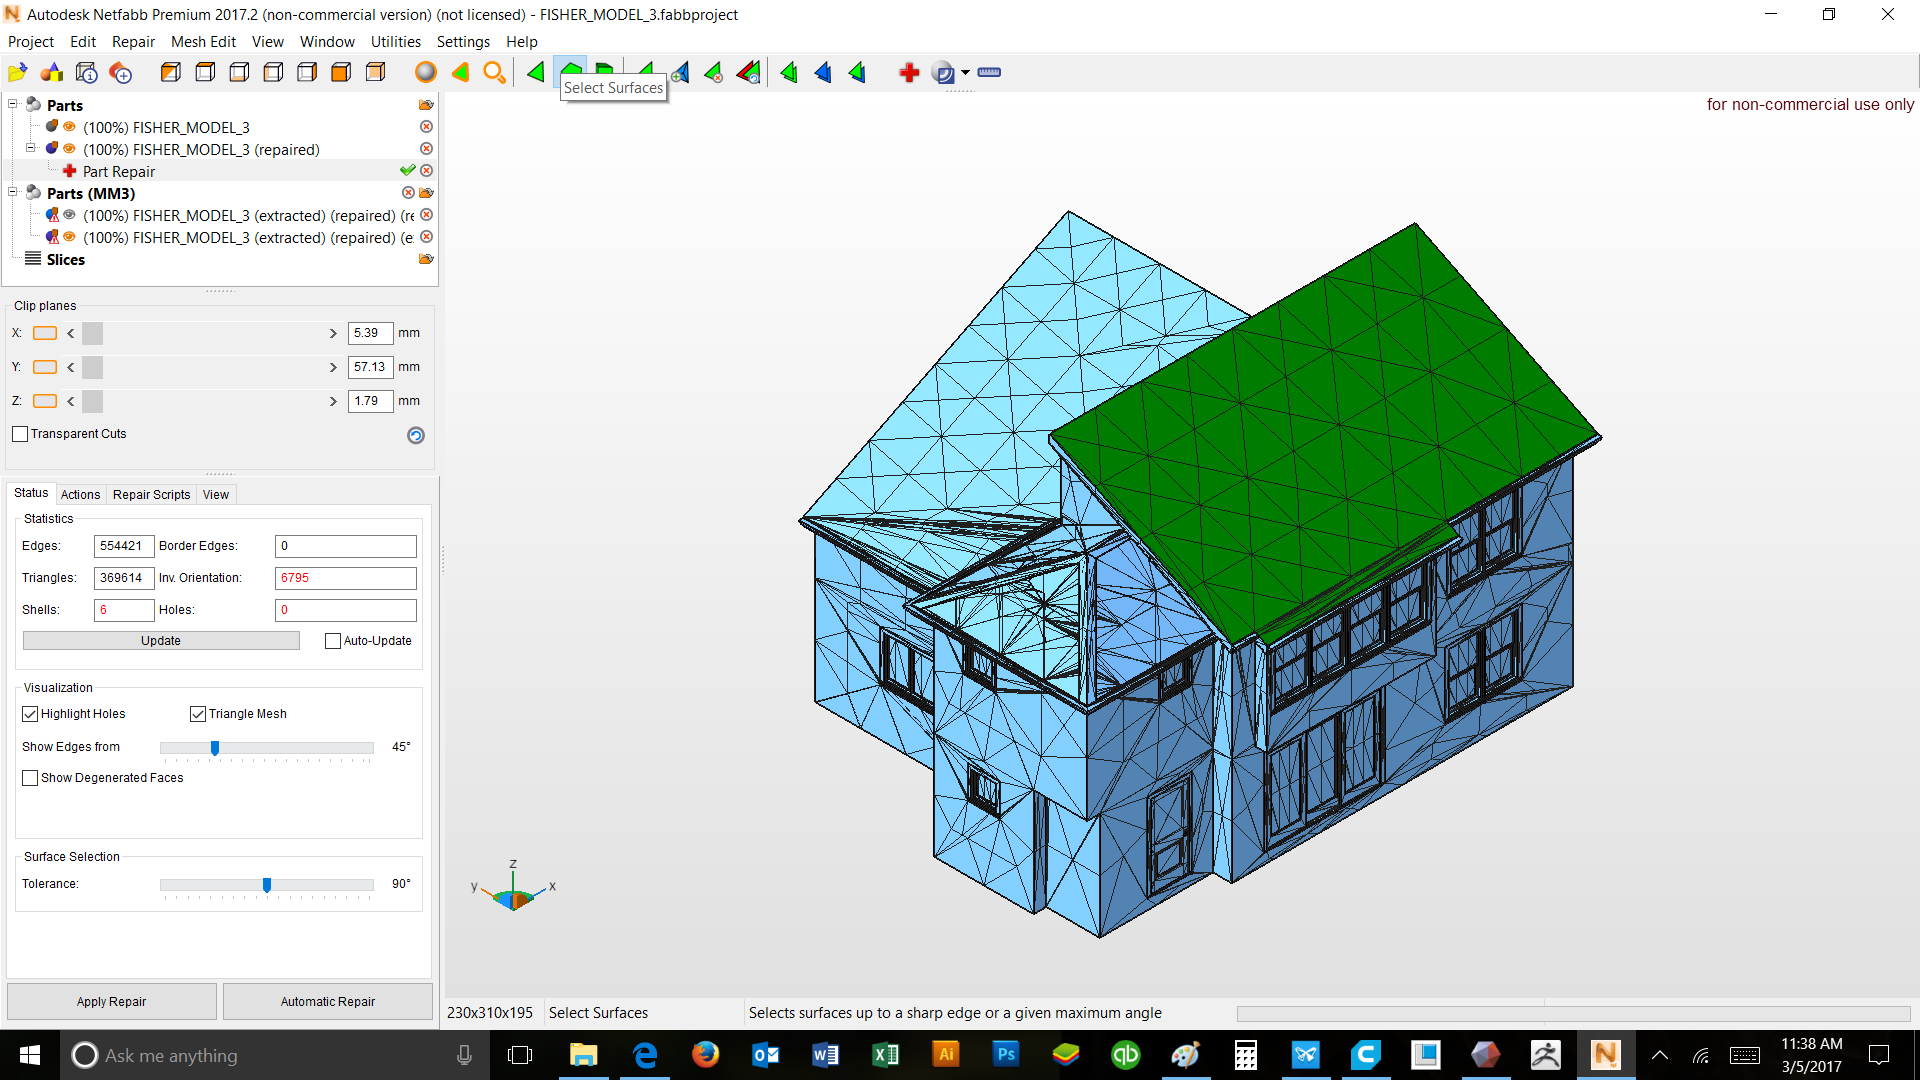
If all the interior components are separaate bodies, it should be fairly easy. MGarrity already suggested using Meshmixer to do the job, but NetFabb can do the same thing as well. Open up the complete model, then click on the Repair tool (The red cross). Use the “Select shells” tool, and click the main body of the house. When it turns green, right click and select, “Extract Select Triangles as Part”. This will extract only the outer shell, and whatever parts are still attached to it.
To see what’s left, you can also click “Remove Selected Triangles”. This will delete all outer shell. On the right pane, click the eye next to the newly created part to hide it. Now you’ll be able to see what’s left over (hopefully all the interior parts. If nothing is left over, that means that all the parts, including the interior are interconnected into a single shell.
The only option at this stage is to use either the full version of NetFabb as previously mentioned by Randy Cohen, or you can use MeshMixer’s Make solid function to wrap a new skin around the model, then get rid of the original model.
Hope this helps.
This picture will hopefully illustrate why I am having such a hard time… The walls, floors, and ceiling consist of two sides, thus creating a shell in itself. So the house is in fact a seamless shell wrapping around all the walls and floors.
Oh, wow. That model is a single shell (other than the windows and the cabinet.
Depending on how dedicated you are, you might try to remove all the interior parts (walls, cabinets, beds, etc.), but it will take a long time and a lot of work.
If I were you, I would ask the client to export the model without any of the interior components. I might not be possible for them to export the outer walls without the inner walls, as they are probably connected, but he should at least remove the beds, chairs, cabinets, counters, etc. and leave only the walls.
You should show him what you just showed us here and explain why this is not going to work without them doing some prep work before exporting the file for printing.
Anyway, if all else fails, try the Meshmixer Make Solid option. It works quite well, but if you want to capture all the detail, you’ll have to crank up the accuracy and the mesh density, and that can take a long time. But in the end, you’ll end up with a pretty good model.
Unless you’re going to print it small, you probably don’t want to print it solid. It’ll use a lot of resin and take a long time.
It looks to me like the exterior shape is geometrically relatively simple. Ignoring the window details, it consists of a few large rectangles. You could generate the outline with a dozen or so vertices. I’d create a simple representation of the interior volume, slightly smaller than the outline of the interior surface of the outer walls. Then I’d use CSG to subtract that volume out from inside the house. That’ll leave you with some “stumps”, details near the interior walls where stuff you’ve just removed got cut off, but assuming you’re printing in an opaque resin, these things will be invisible. The interior doesn’t have to be pretty, it just has to be mostly empty. And doing this, you’d end up with a shell with most of the interior volume being empty. Then I’d make a few decent sized holes in the bottom of the model and go print it. I’d position it so the floor of the house is oriented towards the build plate (so, right side up in PreForm) so the roof prints without supports to mar the surface.
The holes I said to make will be at the top of the print, so some resin will be captured inside as the print closes off the roof at the end of the print, but you’ll be able to rinse it out.
5- All done! nice shell or only desired surfaces. Total time about an hour and a half, including separating the deck and manually repairing some complex intersections that didn’t fair well in auto repair.
I plan to print the house itself on my FFF machine, and the deck assembly on the Form 1+.