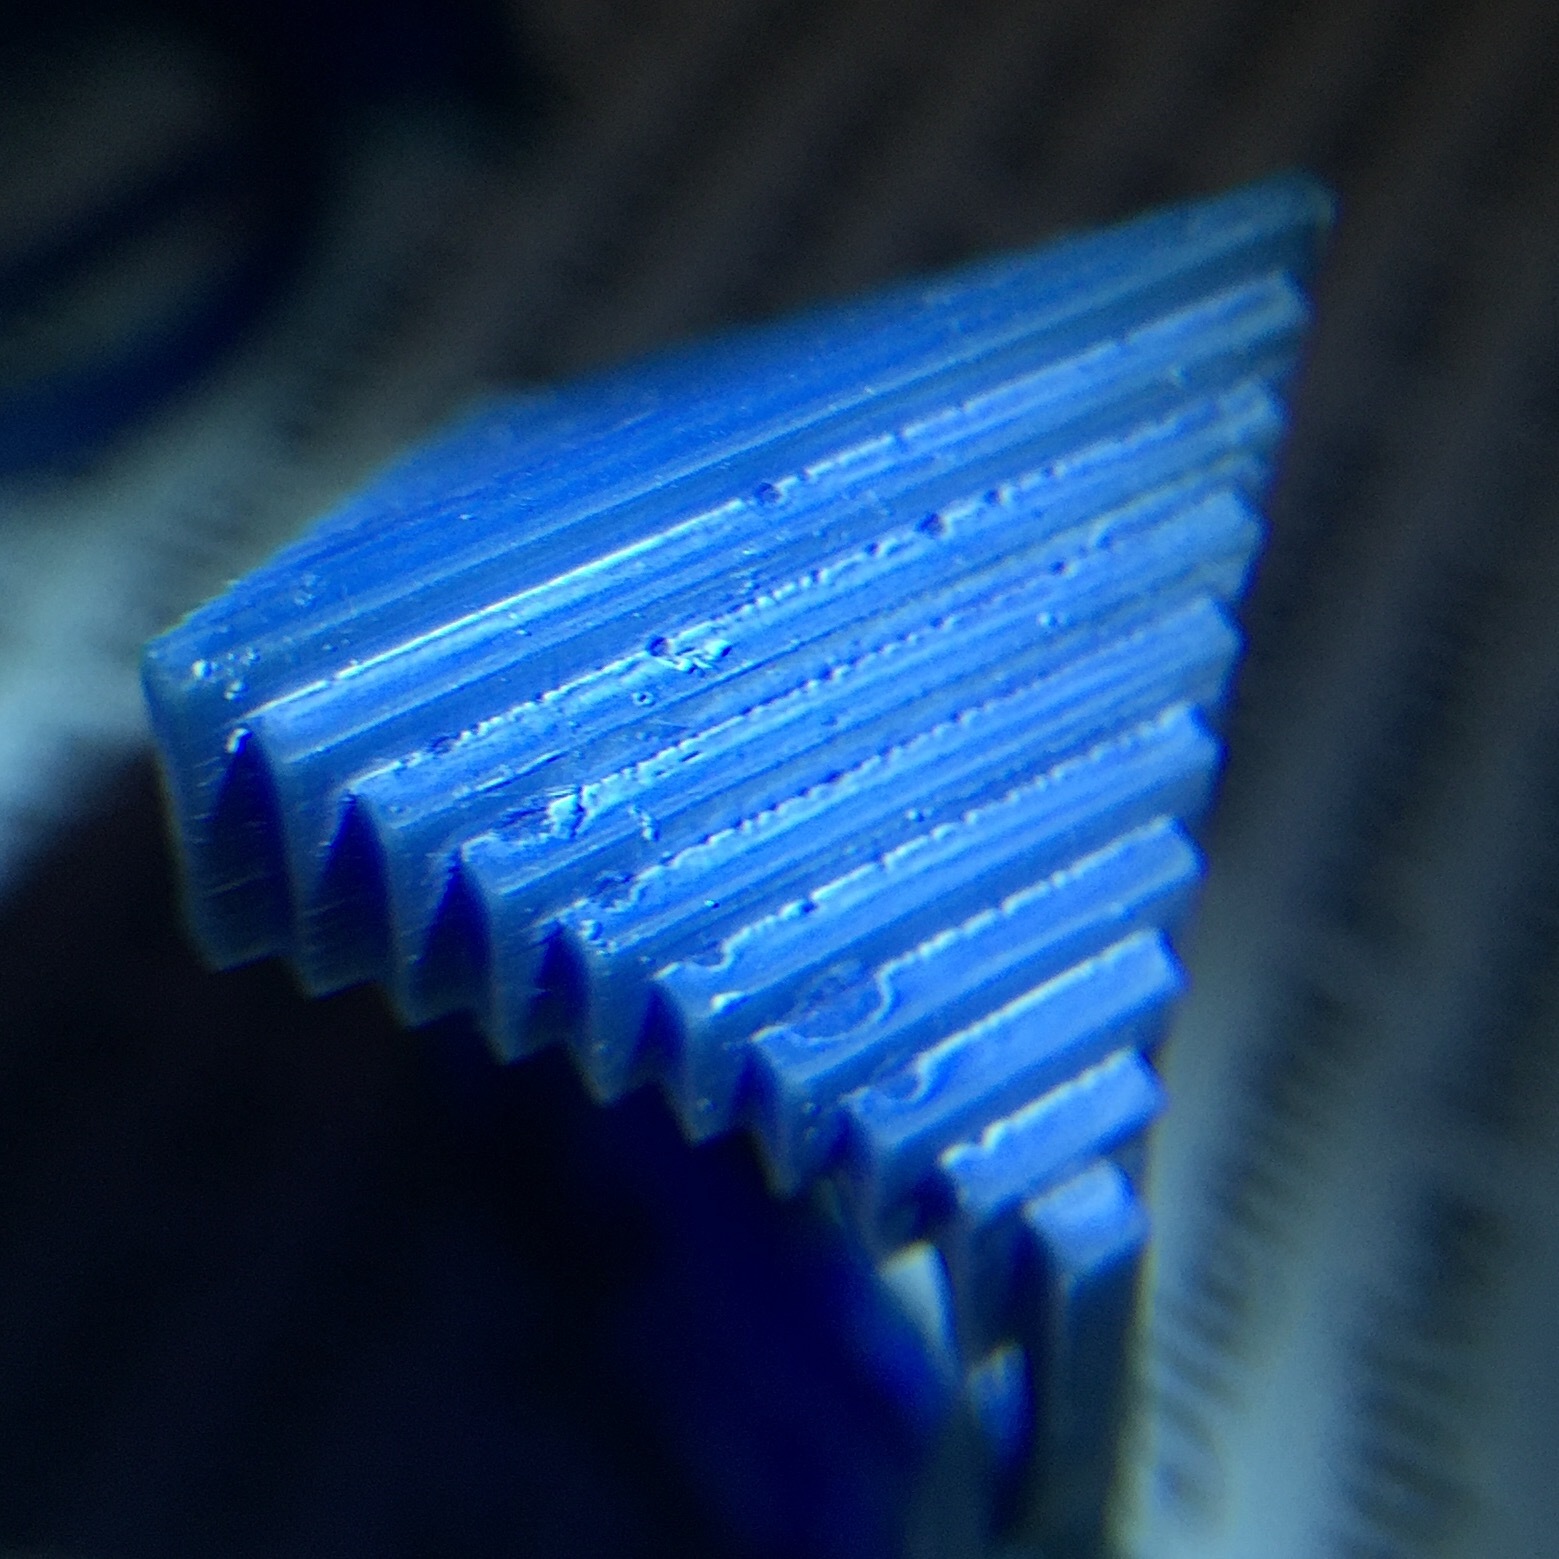
This is what I’m seeing.
A) What is causing the voids/bubbles?
B) How can I solve this?
C) Bonus Q: what causes the surface discoloration?
(Process & Materials below)
MATERIALS:
Castable Resin V2
25 micron setting
POST-PRINT PROCESS:
dunk/agitate in Yellow Magic 7
then ultrasonic cleaner for 8 minutes (same YM7 solution)
then move the rings to a second Yellow Magic 7 bath for another ultrasonic clean (again 8 minutes)
then move the rings to distilled water and cure in the nail UV chamber for 4-8 hours
It looks like accumulated resin that was either inadvertently cured because it did not tend to drip away during the print, or it was residue that was not cleaned off, and got post-cured into hard material.
Try changing the angle of the part in Preform or clean better before post-curing (you might need to use a soft paint brush to get into the corners rather than simply rely on the ultrasonic cleaner).
I’m assuming that you have not already printed this part in this orientation with good results.
edit: hmm, now that I relook zooming in, not sure my cleaning advice is valid. Maybe let Preform orient it, and see what happens.
It’s hard to see but it’s more of voids that look like bubbles than actual positive extrusions/additional resin.
The surfaces where it is a problem were parallel to the optical window so I’m wondering if it’s a mechanical/peel issue.
I’ll reprint as is and test the brushing theory. I’ll check the part directly after the print so I can have a better idea about whether it’s extra resin sticking to it or the problem is already manifesting itself directly on the part.
I printed it before with good results but that was Castable V1.
dumb question, but to be thorough: did you change print settings to castable v2? Did that require you to re-support it?
The bubbles remind me of the results I get when I don’t wait for the bubbles to settle out after I mix up the resin in the vat.
print settings and supports (not created in PreForm) unchanged from castable v1 settings (which worked).
i could see this being the right diagnosis but the surface imperfections were on the top most portion of all the rings (a few others which were not posted had the same defects). i can’t imagine the problem would manifest 4-5 hours after squeegeeing, or?
I haven’t read the whole thread, but here’s a random thought…are you orienting the layers of the pyramid so they are parallel to the build platform? [I just looked at the print and see that the pyramid is on its side…]
Still a little new, but I had some problems with a couple of prints that were oriented that way…when I tilted them slightly it fixed the problem.
I have not had any problems with bubbles in V2, and I don’t recognize the discoloration. I have only printed with V2. Did you gently mix the resin container before loading? I did find that when I left the resin tray for a few days without using it, there was a marbling to the resin…I used the putty knife to mix it in the tray.
You using the wrong solvent to rinse, leaving leftover polymer in the grooves. Use the recommended solvent to rinse the build, as directed by the manufacturer.
If it’s Castable V2, I’ve been using isopropyl alcohol 91% from the pharmacy/grocery store and it works fine. On some prints, I used a small, soft paintbrush to make sure that it was clean after the first rinse with no damage to the print.
I am using Formlab 1+ and using castable 02.
I notice a bubble on the inside of a mode.l when I put it up to the light and did not
think much of it since the surface was fine. It did not show up on the casting, so that went well.
When stirring castable 02 resin it creates bubbles so I assume that I did it too much.
The Formlabs 2 printer uses a wiper so that may be the caused the bubbles.
Using Open Mode and stirring slowly may be a solution but with Open Mode it cuts
you from the heater and that might cause other issues if the settings in the software are the same.
Just my observation.
Looks like the voids are material the laser isn’t curing. Cleaning process doesn’t seem to be the issue. If it was then there would be uncured resin all over and totally lack details.
Do you notice bubbles on the parts surface prior to cleaning?
Is there a chance the material isn’t mixed well enough, or perhaps expired? I think if there where any chunks it would cause the print to fail all together which doesn’t seem to be the case.
If you have other resins on hand try testing with them.
I use YM here for close to a year but have never used it with castable resin, just the clear and never had any issues with it not cleaning or discoloring. When the parts in the US bath you can actually see the loose resin come off the part and can tell when its done since there would me no more emitting from the surfaces (clouds).
It usually takes 480 sec one pass for most my parts.
Though I have the Form1 I have never had any problems with bubbles in the resin and tend to shake and mix the @#$% out of the resin prior to use. The platform will squish the bubbles out.
Wanted to say that there is a chance bubbles is excess resin on the grooves. After looking at the pictures closer it seems the YM isn’t taking all the resin off. You may have to heat up the YM if your us cleaner has a heater and kick it to 120F.
If you have a chip brush on hand it wouldn’t hurt to scrub over the areas with light pressure. it should clean up fine.
Like I mentioned before I have used it on regular resins so far with good success but it might take a little more work on the castable resin.
the layers of the pyramid were parallel. i think this is contributing. thanks!
more thorough cleaning, heated ultrasonic, as well as gentle brushing with a chip brush seemed to solve this.
i am still seeing some yellow coloring to the castable V2 after using Yellow Magic 7.
Is this normal or am I leaving the part in the YM7 too long?