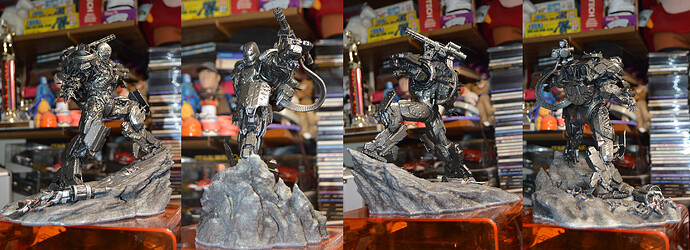
Another print of Joe Grundfasts's War Machine

When I saw Mattia Mercante’s War Machine Print, I had to give it a try myself, and after a lot of trials and tribulations I finally coming to a point where I can show off the results.

When I downloaded Joes’s models (I had to have them converted to OBJ by a friend, since I don’t have ZBrush), I realized that I was in for a lot of work.

The model is beautifully made, with a tremendous amount of detail, but it’s not really printable in that original state. There are tenths of thousands of individual parts in it that intersect each other, and there are parts that while they appear connected, they in fact not attached to each other at all. There are little bitty pieces that are so small they wouldn’t print at all, and other that would print, yet would be so thin, they would simply warp and break off.

With that in mind I loaded the model into MeshMixer and tried to thicken, merge, and otherwise connect that parts into a printable mesh. The model was so huge, that I couldn’t do anything with it without crashing, so I decimated it by 1/2, just so I can be able to load it and work with it. Even then, I had to up the RAM in my computer to 24GB.

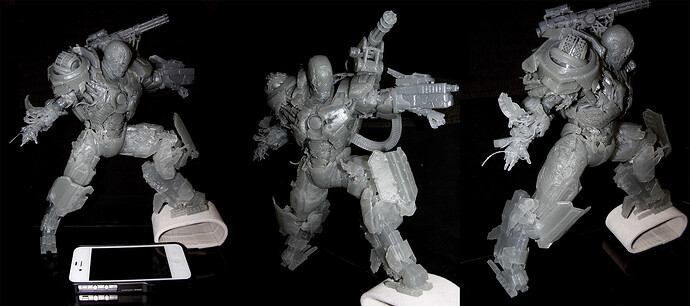
Anyway, one of the tings I wanted to do, is retain a lot of the small detail the model has especially in the areas where the outer skin had been torn and you can see the wiring and mechanical parts. I separated the model into lots of small parts, but then recombined some for printing. For the final prints I had the torso, arms, head, mini-gun, ammo belt, pelvis& thighs, and legs. In all 9 separate parts. The parts were printed at 1.4 times the size of the original model.

There’s an iPhone 4 in the first image on the left, to give an idea of the scale. From the tip of his right foot to the tip of the minigun, it’s 11" long.

After the model cured I gave it a coat of flat black paint, which really made the details stand out

The next thing I need to print is the rock it stands on, but when I check it out in Preform, it would have used more than 1/2 a liter of resin, so I’m not quite ready to concede that for a rock, so for that I will use my Soldoodle FDM printer.
2 Likes

I have the files myself but need to fins someone with zbrush to convert it for me, I would love to print this and add it to my collection of models. It is an incredible model.

Unfortunately I have no way to upload these files. The 2 files, once converted to OBJ format, are 1.25GB in size.

Suggestion Make the rock hollow. Designs the surface and then offset the surface by say 1mm to give you a back face and that will use much less resin.

post it though dropbox.com

It is hollow, the walls are 2mm thick, yet, it would still take about 512ml of resin.

I already started printing the rock on my FDM printer. Total print time for the 4 parts will be about 43 hours when printed at .2mm layers. I already have 2 parts done, and the 3rd is printing as I type this.

The debris parts, laying on the ground will be printed on the Form 1+, then glued on the surface.

Good job on getting that printed, there’s a lot to consider when trying to do complex prints–makings sure the parts can actually print, making sure they fit in the print volume, making sure they can fit together, getting a good orientation so that the details come out best, designing it so you can put it together in the right way and be able to clean and paint it. Lots of work. Currently I’ve got a project that’s currently at 174 parts to get the best results. I’ve been able to improve it a lot though since I first started working on it though.

Does anyone know if these files are still available? I downloaded them at the time but lost them when a hard drive failed.

At the suggestion of George Earussi I uploaded the 2 files to a DropBox. Below are the links to the 2 files converted to OBJ for those that want to download them.

A word of warning. This is a huge model, so unless you have the ultimate, über machine at your disposal, I suggest decimating the model down to at least half the number of polygons, or you will not be able to work with it.

https://www.dropbox.com/s/zemg14uotsyitxx/WM_Torso.OBJ?dl=0
https://www.dropbox.com/s/xzerxx1kegusrr1/WM_Legs.OBJ?dl=0

Enjoy.

P.S. The files will stay there for a week, after that they’ll be taken down, and someone else should share them afterward.

Update 7/6/2016
The links above have been disabled.

Someone asked if these are the ready to print files.

No, these are the raw files that were posted by the designer, Joe Grundfast, I just converted them to OBJ format for those that don’t have the means to do that for themselves. They will most definitely require a lot of work to make them print worthy.

Hi Thanks for that, I believe they were originally in ZBrush, really cheeky of me, but do you have those? (if in fact it was ZBrush)

You can still download the original files from Joe’s original post:

War Machine by Joseph Grundfast

I posted the OBJ files here, primarily because a lot of folks don’t have ZBrush, and couldn’t convert them.

1 Like

I finished the printing the rock on my Soliddodle 3 FDM printer, and painted it with Krylon Natural Stone Textured Charcoal. The texture gives the rock a very realistic feel. Once I add all the little broken parts I may do a dark wash on the rock to accentuate the crevices.

3 Likes

Finally all the parts and pieces are printed, and the only thing that remains is the paint job.

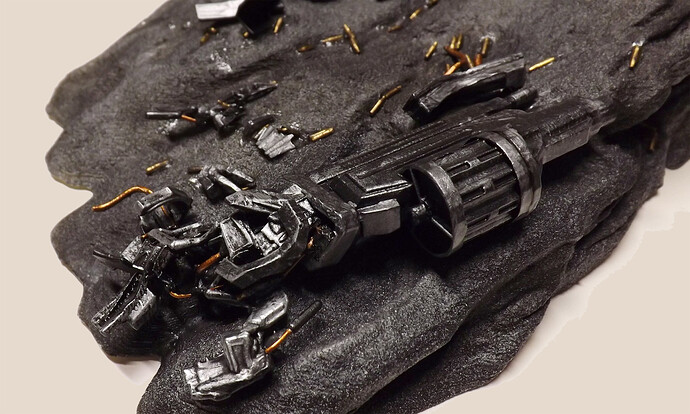
Today I finished assembling and painting the rock and all the debris on it.

And here is a close up of the broken parts.

The War Machine is next

2 Likes

looks really good so far.

Here is a quick teaser while I get the details painted

3 Likes

Looking Good!

Finished at last.

I took a break from this model for the past week, but today, I put the war paint on. The only thing remaining is to either find or build a display case.

1 Like