Unsuccessful castable resin results using investment casting

Just like to share my experiences working with my investment casting house. So far I haven’t been able to produce any results using the castable resin. I don’t own a Form2 machine, so I’ve been subbing that work to a printer that is making the castable models for me. Maybe someone that has done this method can shed some light on my issue?

Most of what I’ve seen from formlabs are people using the castable material for jewellery. In that sense, the molds are small, and you put the wax/mold into a flash and fill it with plaster. All the instructions I see are typically for those processes.

The other method, investment casting or shell and wax casting is what’s used in more industrial areas. Formlabs does not have any instructions for this process. The method for the wax is simple, you put the wax on the tree, and then you dip it into a ceramic slurry, then dry it, and repeat the process until you have basically a shell of about 8-10 layers. It then follows the same process by going through the autoclave to melt the wax out.

The first issue I came across is that the Preform software does not hollow out and build internal supports. So what I’ve been doing is going into meshmixer and hollowing it out and replacing it with a lattice. This is important as the larger the piece the more ash residue it will leave behind, so the less material the better. Not the best but that’s all I could do.

The second issue, which is the material expanding and cracking my shell. I’ve tried to print 3 models, and they’ve been cracking and exploding my shell during the burnout. I’m sure Formlabs will tell me to follow the burnout schedule that they have published, but it’s not possible as my casting house only has one furnace with a set temperature at 1800F. The first two times it happened I assumed it was because the material didn’t have enough time to soften so it could implode inwards as it was hollow. So I asked my casting house to put it in the morning so it would start at room temperature and slowly get up to around 1500F. It’s not a ideal ramp up, but I was hoping that it would give it enough time for material to soften so when it expands, it would implode inwards. The shell cracked and fell apart at around 800F.

Does anyone have any ideas? Since I don’t have a Form2 it is just too cost prohibitive for me to keep on printing different samples until I find the right settings.

Also a quick note, my casting house is experienced with 3DSystems Quickcast material and they have very little issue with casting those 3D material without changing any of their normal methods. Mind you that the Quickcast material is specifically manufactured with investment casting in mind. They have a paper out detailing a lot of the issues I’m having and how they go about it.

Here are some photos of the part and the process that I tried to document.

The part itself. It is hollow with some internal lattice support.

Part on the tree
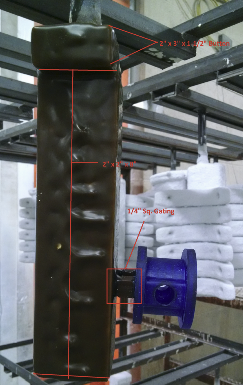
Part after dipping in the ceramic (notice the actual wax tree on the background!)

Part exploded after reaching 800F

Hi kdec - thanks for sharing the feedback, really cool to see you trying a bigger part with this method. Are you post-curing the parts? This really is a critical step for successful burnout, the properties of the part change significantly with the additional UV post-curing. You can review our whitepaper which shows how post-curing happens due to a combination of 405nm light and heat. For such a thick part, I would probably suggest 12-24hrs in a nail salon, or less time if using a more powerful setup.

Jennifer,

Thanks for the suggestion. Now did anyone have any tests done on investment casting and found that the curing was an issue with shells cracking similar to mine?

Your whitepaper doesn’t specifically indicate any kinds of issues, other that it was not structurally sound during the mold making process, which I can only assume leads to the fact that the resin was soft, so it deformed under the pressure of the plaster due to the lack of curing. In another words, you have a ring that was a circle, and ended up with an oval ring.

My issue is that my shell is cracking, and I am currently thinking it’s because of the expansion of the resin due to the temperature and the thickness of the shell during the burnout process.

Most of our customers using castable resin are doing much smaller volume parts for jewelry. Industrial casting with SL is often done with parts that are printed mostly hollow (with trussing or mesh inside) to minimize the amount of resin that needs to burn out and minimize the pressure of expanding resin. You could try something similar with this part.

Thanks for the reply. Yes my part was made hollow with a lattice inside. Unfortunately I do not own a Form2 so the samples are too cost prohibitive to attempt multiple samples to find the right combinations to make this work. I do however have a good access to our foundry who are willing to attempt to cast them if I can obtain more samples.

For now, short of obtaining a Form2 so I can attempt to test various configurations, I’m going to scratch this off the possibility that the castable resin will work with investment casting.

1.Wydrukuj with black resin. Cure UV lamp.
2. Make the form of silicone - for instance of this: http://www.castaldo.com/english/products_eg/lc/lc.html
3. Cut the form and remove the resin model.
4. Fill in the form of a silicone wax jewelry.
5.Model wax hang on the tree.
100% effective

Following.

Marek, thanks for the suggestion. Creating a silicon pattern mold is difficult for the part in my example. As you can see from the tree in the background in one of the images, we currently have the aluminum patterns that makes the wax molds. That pattern is made with a core, because you cannot just have two halves and pull it apart. It requires a third ‘core’ to make that internal cavity. Pattern making is not something my engineers know how to do as well. This is quite common in most of our products, as they’re mostly pump parts in stainless.

Kdec, did your lattice structure allow for the liquid resin to be drained?

We have had very good results using our 3D Systems machine with solid mold casting with pour weights at up to three pounds. We do not use Quickcast technique. However, you must have a dwell time at 300 degrees F for a few hours and another dwell at 500 degres - otherwise extensive cracking will result. We still see occasional cracks. Maybe the solid mold is stronger and tolerates a bit of cracking without exploding. We also try to minimize section thicknesses which helps, too.

Solid mold technique may not fit in with your foundry or your part is too large… Lack of foundry ability to deal with RP patterns was the main reason we do it ourselves.

Also, we have made large parts (for us) using a modified silicone molding technique. (We have even injection molded styrene!) You can get a lot of rubber mold with fiberglass backing techniques from youtube. It has worked for us.

Bill Box

Yes the lattice structure was made so that it wouldn’t trap any resin.

Glad to hear you had some success with larger items. My foundry only has a single furnace that runs in one temperature, so that’s why it’s difficult to follow Formlab’s burnout schedule. I’ve actually had some semi-success using a FDM machine with PLA material. So I’m going to attempt to go that route more. Right now there’s too much residual ash, but I think I can get my foundry to include a step to clean out the ash first.

Here’s the part casted in 316SS, the left is of course the PLA material, the right is an actual casting from wax.

This topic was automatically closed 14 days after the last reply. New replies are no longer allowed.