Testing Continuous Support vs Conventional
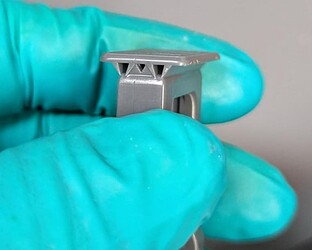
I started experimenting with adding custom support in CAD and printed a comparator in Tough 2000 with a face on the bed and three Preform supports to address the warnings. On my presupported model, I made 0.2mm “rails” around the rectangular base (the face I placed downwards). I made sure to add a bevel to the raft to make sure I could catch the edge of the scraper under it and I made sure that there were holes to the central void to prevent a suction cup from forming, as well as allowing better washing.
Slicing
The job settings were 0.1mm layers, with Default print settings. I deliberately ignored the support warnings on the presupported model, as I was confident it would print properly without.
How they looked in Preform:
Results
The presupported part printed fine and was easiest to pop of the flex build plate, because there were no disconnected support bases to worry about (long and rigid connection, so easy to pop because I aligned it across the bend axis of the steel):
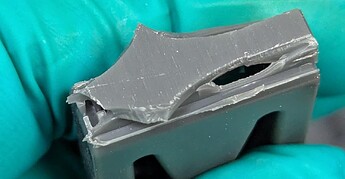
However, the results for post processing and finish were not good.
In contrast, the part I placed straight onto the bed with a few manually generated Preform supports was very good. There was minimal “blooming/overcure” around the edges of the face on the plate. In fact, taking into account that Preform automatically extends the cross section at 0.75 mm height all the way down to the build surface (effectively negating angled edges caused by chamfers and fillets):
(PS, you can see the 45 degree hole I added to the bed-mounted part to prevent suction cupping)
Discussion
Now this somewhat surprised me because the reason I had been concerned about direct printing on the build plate was due to prototypes I had printed in Grey V5, which came out with significant flaring, even when the walls were vertical and the effect of the “early layer unioning” (ELU) was irrelevant. Note that on the Tough 2000 parts, I do have a slight fillet around the outside, whereas on this V5 practice part, the walls are vertical to the bed:
So there’s clearly a difference in the approach to curing the first few layers of Tough 2000 and Grey V5. I am happy that Tough 2000 is better, as this is the material I want to use for production, but at half the price, I prefer to prototype in Grey V5 and it would be nice if the parts came out dimensionally equivalent for a given slicing strategy.
Lessons
- Tough 2000 was pretty good straight onto the bed. Due to the success of the unsupported upper half on my presupported model, I might try printing straight onto the bed without any support.
- Presupport bevelled rafts are great for print removal from the flex build plate.
- My presupport also produced a successful print without noticeable defects, despite Preform warnings.
- The anti-suction-cup holes in my presupport meant I didn’t need to put a hole in the part.
- My presupport didn’t break away cleanly. I need to improve this if I do it again. 2 ideas: make the transition to thicker material steeper, so it concentrates stress against the contact points and reduce the rail contact width to either 0.15 or 0.1 mm for Tough 2000.
Conclusion
I think there’s a lot of potential to improve the way production customers exploit Formlabs SLA and draw people in as customers. I thought it was possible partly because of the videos of @leonhart88 and Formlabs themselves. But the corporate flashy Shorts are not the deeper level content that serious customers need. We need more guidance, videos, blog posts, forum posts from the likes of Alex McCarthy and his team. It is clearly model and material specific stuff, so even acknowledging that and explaining an approach to help people find their sweet spot would be great.


