I’ve seen this before be thought I should ask as I’m interested to know and learn more.
This model I’ve optimized for 0.1mm layer height and Tough 1500. Yesterday I printed it in 0.05mm just to see the result, but the by far most significant difference was how compressed the first layers were as you can clearly see on the pictures.
The model is printed directly on the build platform and have a “foot” which prevents most of the elephant foot artifact on 0.1mm but on 0.05mm it clearly didn’t work nearly as well.
Are the first layers (z-compression?) handled differently for different layer heights? If so, is there some information about it so I can understand and work around it without trial and error?
Is this unique for Tough 1500 or are similar results to be expected from all resins?
Thank you for sharing this interesting observation! Print settings (including Z-compression and early layer exposure settings) are handled differently across resin types and even across different layer thicknesses, as you noted here. I don’t have specifics on how each combination of resin type and layer thickness affect print results, and these settings are continuously being updated via new PreForm releases. I believe running small test prints, although somewhat inconvenient, would be the best way to get a sense for how each settings combination works for your parts.
Given this - how feasible would it be for PreForm to have a visual preview of such layer compression, if it indeed is so variable between resin types, settings and even releases of software?
I agree that this would be a useful feature, and I will pass your feedback along. PreForm does give a visual representation of Z-compression correction when used (see Editing Advanced Settings for supports in PreForm), however this is slightly different from your request.
I just re-ran this test and got an even worse result. Not sure if this was due to the new version of PreForm or what, but this is clearly not usable and should be getting attention internally.
Same model, 0.05 on the left and 0.1mm on the right.
Thank you for sharing this update. I’m sorry to hear that you have seen continued poor results when printing directly on the build platform. As you mention, it is possible that this could be linked to a particular PreForm or firmware version, as print settings adjusting early layer performance can be affected by this. If you have not done so yet, I would recommend creating a Support case so that we can better document and address this issue.
I’ve been printing the last few days to stock up on my parts. As I don’t trust my printer I’ve been playing it safe, printing one set (8 parts) per print, just in case something would fail. Though nothing has failed so my confidence grew and I printer double the amount, 16 parts which is about 2/3 of the build plate.
Now I just took them out from the Form Wash, just to see that they all are more or less useless. Notice how most of them have the same effect as the one I posted above but these were printed in 0.1mm which has worked great before and I used the same mode, just “array” it to the number of copies I needed.
When I look in PreForm all looks good, but under supports/advanced z-compression and layer merge is reset - this has been set to 0 and as you can see on the preview it’s rendered like that too.
Could there be a bug in PreForm?
I just wasted 100ml of Tough 1500 so not very happy right now… I have to produce parts but what shall I do now? Just try again and risk loosing another 100ml?
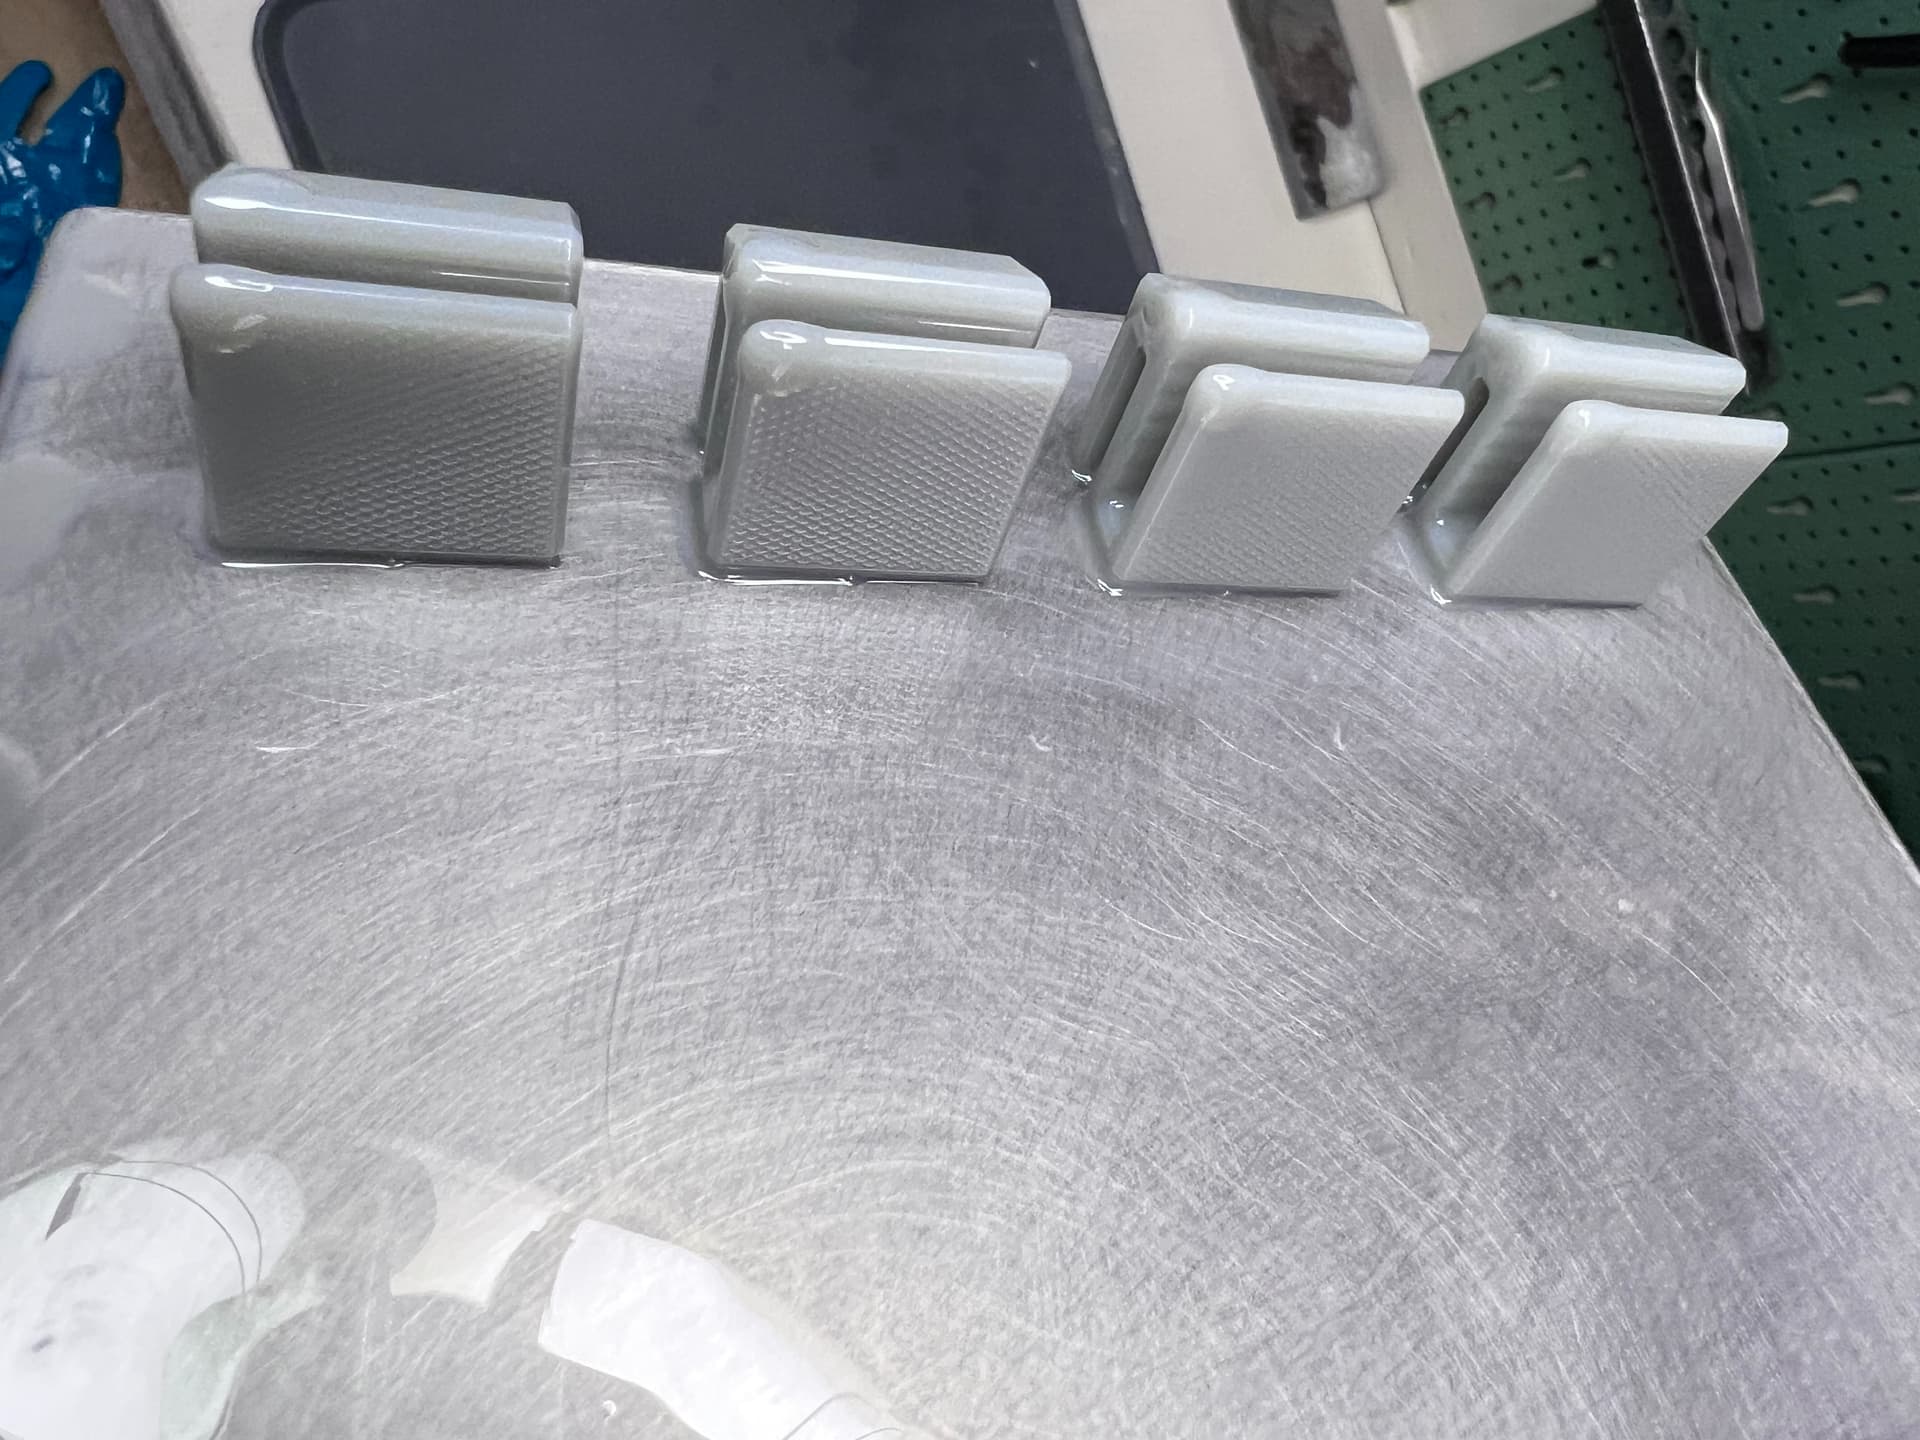
This distance should be 3.35mm, I always measure that and in normal cases it’s very accurate and repeatable, fluctuates only around +/- 0.02mm. In this batch one came in at 3.24 and on at 3.42mm, rest was spread in that range.
Here we can see the problem more clearly, on the top we have the one measuring 3.42mm, middle 3.24 and bottom 3.35 (this one is from a previous batch and in good condition).
Good (previous batch) on the left, other two on the right. See how the resin has made a massive elephants foot.
I’m not so sure this was PreForm adding some (invisible) support structure as it’s so different between the parts in the same batch.
And just to have it said, I’m using the same tank, build platform and resin cartridge.
Thank you for following up on this. I understand these results are far from ideal. Regarding your question about PreForm, I believe the Advanced Settings should stay the same as long as the print settings (resin type, layer thickness, etc.) are unchanged. Regardless, if the supports are not re-generated, I don’t believe the new values for Z-Compression Correction and Early Layer Merge would be applied to the print.
In order for us to look into this further, I would suggest sharing your printer’s diagnostic logs with our Support team. They would be able to check for any optics-related issues that could be causing this early layer inaccuracy.
Ultimately, some amount of over-curing is necessary during the early layers to ensure adhesion to the build platform. Adding a raft and supports to the parts, while not optimal for throughput or resin usage, would ensure that the over-curing of early layers does not impact your final print results.
I understand it needs todo some over curing, but it’s not like the machine is incapable of producing good results. Here are some of the parts I just recently printed.
These are all good and very consistent. The problem is these random issues that seams to occur when you least expect it.
I did do another print - to be sure I redid all supports and this was the result. They are curing now so I haven’t been able to take any measurements yet.
The one that did stick to the build plate seam to have come out fine.
I just started yet one more test print, this time I just took the same model and made four of it too see how that turns out.
I’m not sure if I have too high demands but I just want repeatable results. I know the printer is capable of producing great results, it’s done so many times. But these strange failures are taking their toll on me…
Btw, do you want me to just upload the diagnostics logs from the printer, nothing else and you can take a look?
We understand your needs - I wanted to provide some clarification and help set any expectations as needed so we can best assist you.
Our support team would be the best avenue to best assist you, as on the forums, me and Jesse are only able to provide troubleshooting at a basic level.
The support team has access to the troubleshooting resources that would help them get to the root cause and help you work towards consistent successes with your future prints. Uploading the logs (the team has the tools to explore this) to the support case itself along with this information will go a long way to helping you get successful if you have not yet.
Thank you for your understanding and patience in this matter!
I’ve measured the two parts in the previous picture and even though on of the had an edge that had come off the build plate, both are within spec.
After that print I printed another but with four parts and those look good too, I haven’t cured them yet so I don’t have any measurements but visually they look great.
Now I just moved those four parts forward on the build plate started another print - my plan is to test those exact parts in all areas of the build plate too see if there is any change in the end result. I have a feeling parts stick better further back, closer to the z-axis linear rail.
Since my last post I’ve been trying to reproduce the issue by moving the same four model around the build plate, back to front and one print with one in each corner, just to see if that have any affect.
All prints have come out successful! Though I’ve found that parts printed in the front of the build plate come out around 22.85mm tall while those in the back are very close to 23.00mm as in the cad model.
I would like to understand why this happens so I can adjust for it going forward.
I tried to salvage the parts from the print failure but they were too messed up unfortunately.
I’ve also looked into what I before reported as a possible cause for the failure instead might be a visual bug in PreForm. If you have setup some advanced supports settings and then go into the job setup to rename your job (not touching anything else), when you go back to the main view PreForm has reset all advanced support settings without notifying you. This could easily lead to some problems.
But it does not explain what happened to my print.
Your best bet would be to reach out to our Support Team with .form files, photos, and measurements of the part so that we can help look into this size discrepancy!