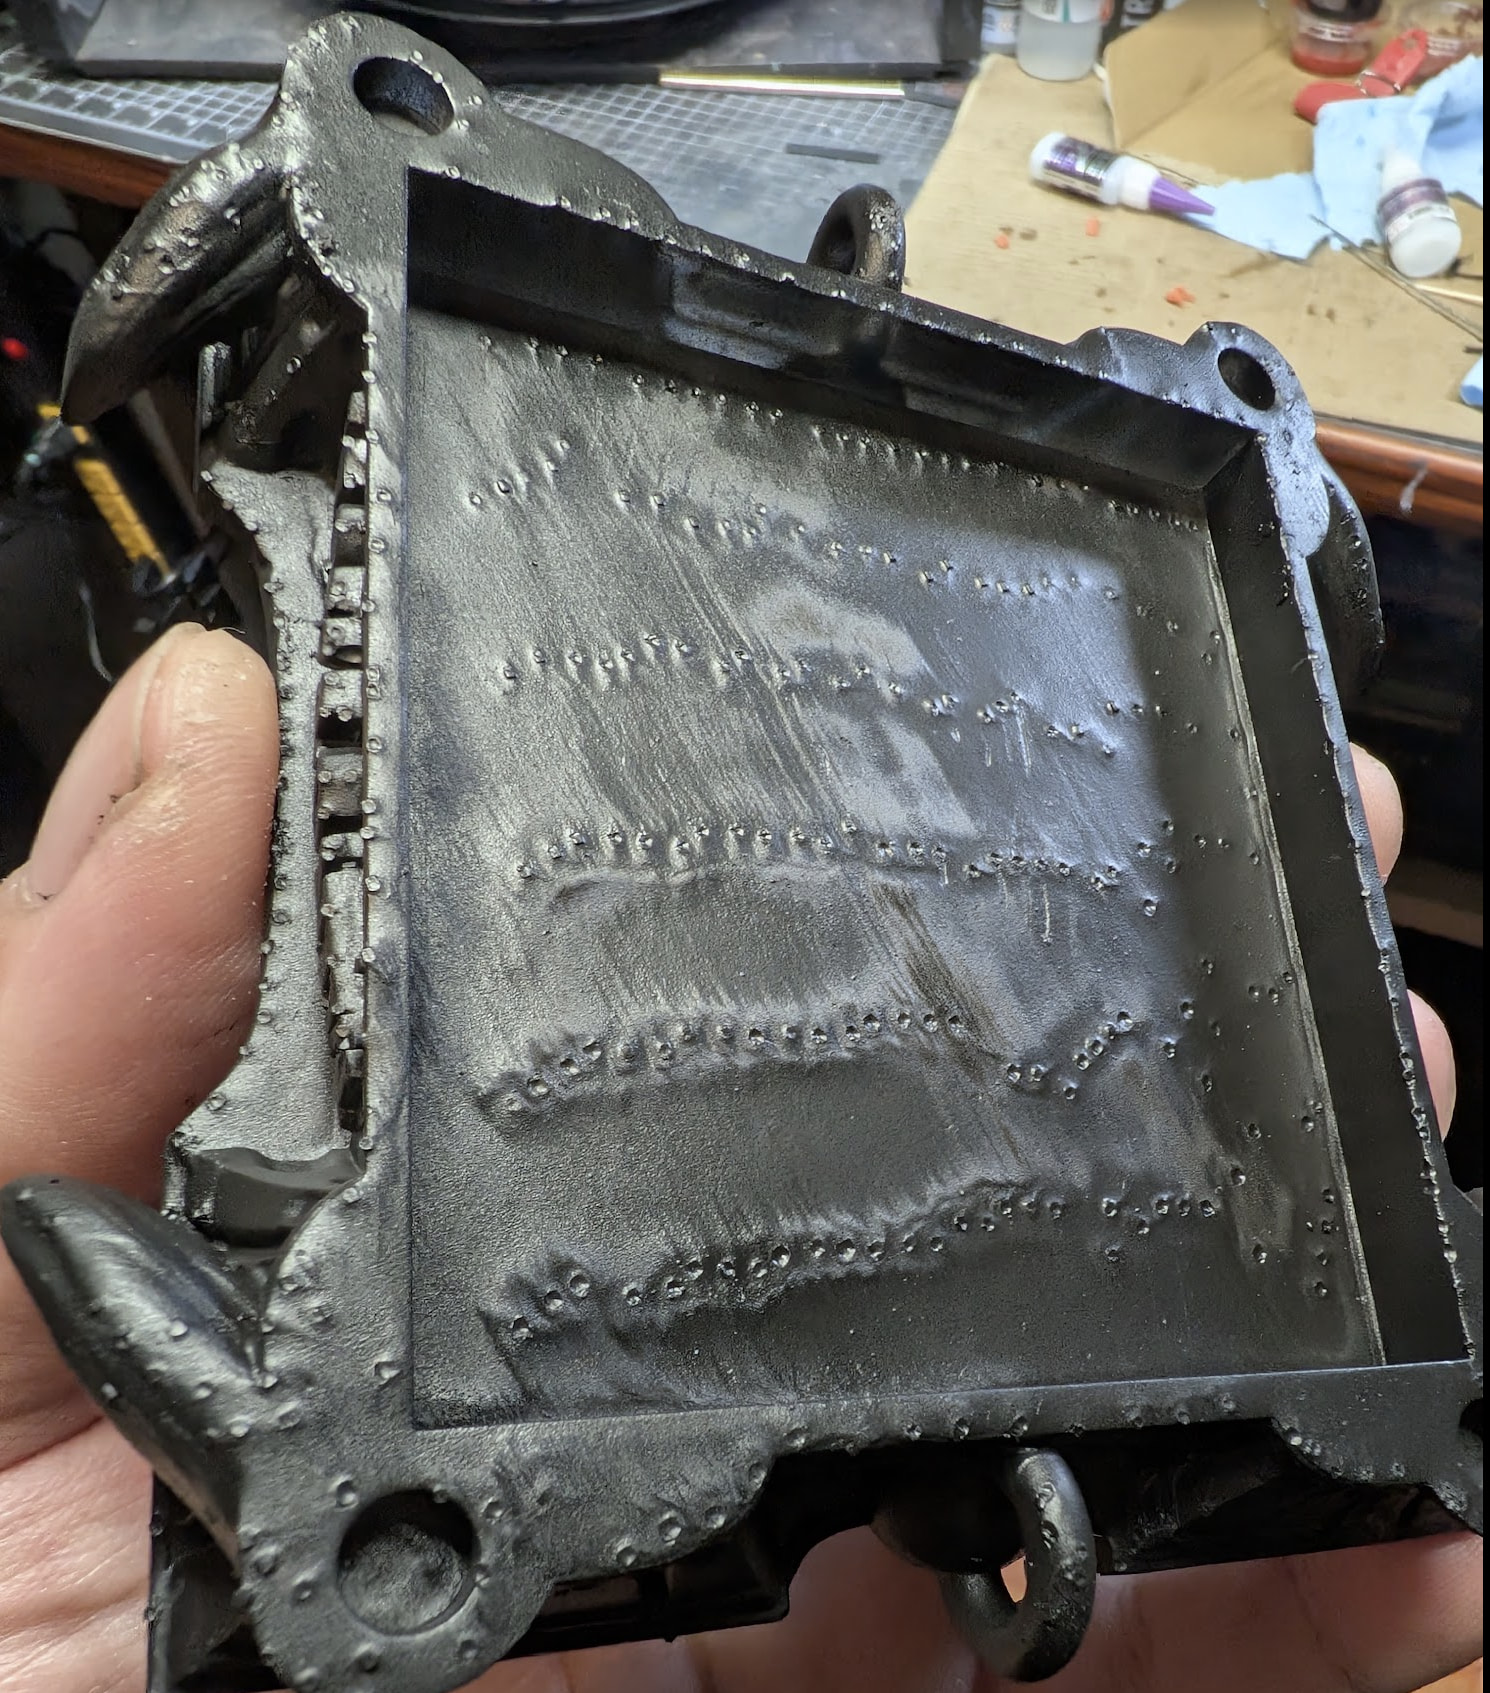
Looking to see if anybody has tips on this. This is a lot of convex and concave at the touchpoints that is a lot of work to deal with. Is this where things are at? I was thinking it was better than this these days.
Looking forward to any help and much appriciated.
Photo of the print and a screenshot of how it is on the bed at an angle. You are looking at the bottom in the photo and the top in the screenshot.
Did you manually set orientation and supports or did you use the auto-generate function? Is this portion important for function? If these are just cosmetic applications, I’d consider reducing the thickness if possible, which will reduce the weight and amount of supports needed/reduce touchpoint
Basically auto placement. It is a lid for a box so I want things to be accurate enough for being a lid without curve so it lines up nice to the bottom portion.
One thing may be of note (not sure) is the tray is a bit over layer usage. whatever that is. 20k? i can’t remember but its over that. Print came out nice otherwise.
This is Clear V5 on a Form4 L
I bundle supports.
It just feels like my old Form 2 over here tbh. My friends Phrozen with RPG resin is doing better in that regard but also he is highly fine tuning and tweaking and i’m closer to stock settings. He is trying to get as little marks as possible and sometimes deals with issues. Shrug
Have you tried testing with everything on default auto? Typically with rigid shaped objects, you don’t want to bundle supports. This is kind of a complicated print as it seems you don’t really have a completely flat surface to register, say for building off the build plate, which would negate the use of supports on the underside. Can you show a picture of the model without supports? Trying to get an idea for what the model looks like
Ok, Yeah I’ve used bundled supports on pretty much every single print i’ve ever done on 4L cause I thought all it did was bundle the “arms” so that you can more easily rip it off. The native Formlabs youtube videos really really made it seem that way. There was no mention of it changing anything else.
I can try not bundling.
I can try with no modifications but my mods are very very little. That print i showed has barely any. even less than in the image i pasted. It was like a tiny bit less number of supports and bundling and thats mostly it. I woudlnt’ guess it would all be that finicky.
EDIT: I just look up close at any given spot and there is crazy craters and what i call “water splashes”. I don’t have the right terminology for this stuff but its like convex + concave at the same time like a donut ring. Like I would love to see other peoples stuff but I feel like people hide this stuff like its an embarassment.
Hi @revel, to be able to look into the issue, could you confirm which resin you’re using? You mentioned it’s Clear V5, but the part in the photo is black. Was the photo taken after painting?
Thanks in advance!
@revel Printing in Clear V5 Resin can have some “light bleed” due to being a transparent resin. You can reduce touchpoint size, but as I read above, that can lead to other print issues, such as print accuracy. I also agree that checking the tank is going to be an important step. Giving your release texture a good cleaning won’t hurt either.
With all that said, we’d be happy to dig in further if you would like to open a support case and send us your diagnostic logs; we can do a deep dive to see if there is something bigger at play.
I could make the part more vertical but then i think i’ll get those divots on the art.
I’ll see how it goes from here. After this project (1 more print and its done) i’m going to swap the tray out and clean the part you mentioned cleaning. Also I’ll probably try smaller touchpoints in the future. I’m not sure exactly what sizes to try for certain prints though. But I do have a basic idea from experience and searches.
When buying the system I was recommended by formlabs the V5 Clear and Tough 1500. I love both. Clear has opened up so much for me because I can always paint it if i don’t want it clear.
This means 100% of all my non-tough 1500 prints are all in clear.
I have these 2 systems and none more mostly because of the cost to expand, namely the dedicated tray(s). Something I really hope Formlabs helps rectify in the future because if it wasn’t that crazy I’d probably have several resins in my arsenal here.
Anyways here is the question. Should I strongly consider a non-clear resin for a lot of my prints? I will ofcourse keep Clear on tap for its purposes but do you think I would see a real difference printing this lid in a different resin?
If so, what would you recommend? Off the top of my head I would do the Grey V5. It is 80 bucks and high resolution. I really want something like my friends very cheap Phrozen “RPG” resin but I understand thats an entire different ecosystem and quality control etc.. etc… The closest I know of for Formlabs is the amazing Tough 1500 - But I’m trying to not print in that for everything mostly because of the $150.00/L costs.
My world is figurines, art, boxes (which are manhandled and could be dropped). Plus I also do car parts like the shift grip in my car is and old Form 2 Grey Pro print. Prototypes of parts. Decorative parts that require accuracy and strength.
@revel Something like Grey V5 would leave less visible touchpoints and a quality print. Grey remains one of our most dialed-in resins. I personally really like Precision Model. Its accuracy and ability to print fine details are amazing. It’s my “go-to” for most of my printing. It is also very easy to paint. That resin is a bit more at $99 USD.
As for touchpoint sizes, there is no easy answer. Lowering them a little at a time is how I’ve done it. However, the larger the piece, the more support it needs. So, for a large piece, with reduced touchpoints, you may need more. I’ve included our guide on Supporting a model in PreForm
I think you could very easily get away with 0.30mm - 0.35mm support tips. For me, personally, I tend to use MORE supports with THINNER tips. Especially since the supports will be on the bottom of the lid, there’s more a margin for any scarring. I’ve not used the clear before, I’ve gone as low as 0.20mm support tips on the tough 1500 and tough 2000.
Additionally, you can angle a little a little steeper so the cross-section of your print is thinner.
There was a big gap between my Form2 printing and this 4L. But I recall I think doing .3 or .35 or something and it was ok. So I will start trying smaller touchpoints.
TBH I got to where I was hand editing and lowering numbers quite a bit on my Form 2 with solid results. But I’ve been going much more “default” and afraid to adjust on the 4L. Not sure exactly why. Could be a combination of the price of the device + running a business now (far more prints that are being sold). heh.
@jessbuck Thanks for the heads up and honestly I don’t think I knew of that resin at all. I did do some comparisons though and it looks like it has quite less heat deflection and also its weaker. The precision sounds really good though. I’ll weight it out but I may go with the Grey V5 to get enough accuracy and detail but also the strength + heat + $ savings.
I really like the matte tan/brown look of the Precision though!
The more you can experiment and understand the limitations of both the machine and the material you’re working with, the better your prints will come out. Customers also like when you can rattle off info to them.
Thanks! Any good videos or tutorials on teaching how to see minimal that needs support. Like how to grow skills in manual support removing and placing?
Those are some decent pits! I haven’t used Clear, though I am currently using Black V5 and Tough 2k, and haven’t had much trouble with the parts I’ve gotten out other than print failures due to messing around.
What layer height are you using as well? You could try adjusting that and see if that helps at all.
From the picture you showed at top, you sort of have lines of supports, and areas without. You could try making more of a grid pattern and see if that helps at all as well.
I’ve also found the same as @DasPrintHaus where using more supports with smaller tips makes it less noticeable, and usually a bit easier to clean up.
I hope you figure out what is causing this, whether it be the older tray or something else!
.25 for art detail for selling figurines. So highest the Clear will do.
Those rows are default supports. I thought it was a bit odd, but seems common on my stuff especially with flat faces like bottoms of boxes. I’ll have to try the grid (like diamond) style patterns. Smaller touch points but a lot of supports.
I never get fails, and I’m afraid of them. Even though I really shouldn’t. I am just so afraid of “catastrophic failures” and stuff that take me out of printing for a while. The 4L is massive. I can’t just ship it easily. Its a beast!
One way i helped fix the underside of those box lids was take a big razor. the kind you put in box cutters. hold it sideways and just scrape and scrap along the underside. Other areas i have to sand
Attaching images so people can see the purpose here. High Resolution. It needs to be decently accurate (on this item i’m seeing some things don’t line up nicely which is sad). Quality prints at .25. In this case i’m making 5 boxes at once.
Super nice parts when printed and painted! I wonder if you could get even a bit more detail out of the Precision Model resin (I use that and grey typically for mini’s). 100% agree with higher density and lower touchtip sizes. I’ve also been tuning down the peel speeds in the print settings editor to push the touch tip sizes even further.