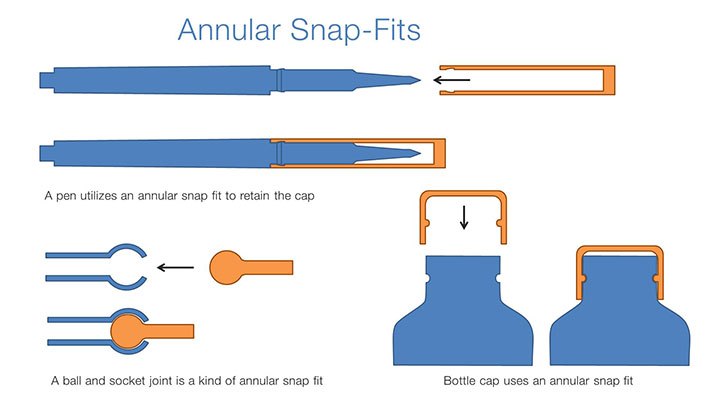
Have very big model of building 40x26x16 cm so I have to print it in segments, How to weld/connect segment of walls, and how to print connections of floor because I cant print whole floor in one go? So do you have some specific klick method (I think it is called snap fit connection) or you use something else to connect segments?
example2
example
Please share your thoughts and your examples if you have it 
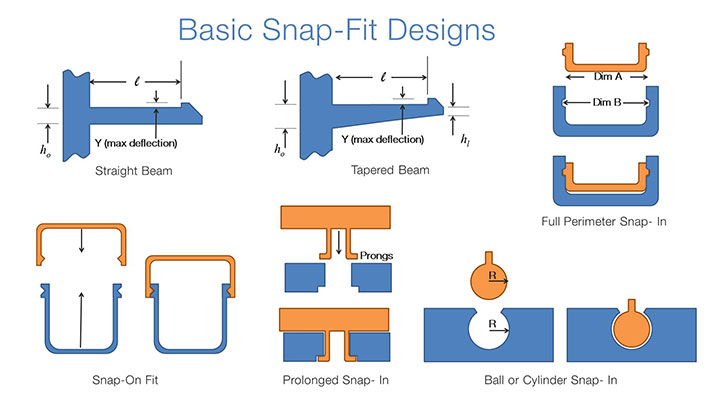
I would say that snap methods like that are going to be too thin. What I’ve done is have an edge overlap into a groove of the other edge–the part that overlaps is half the thickness of the parts so it’s not too thin. But this requires gluing together.
If it’s not detailed then there might be some better options, since printing large flat objects with this type of printer isn’t ideal and there’s other options that can give better results.
any solution for this ? walls will be 0.3 cm (3mm) and floor is 0.15 cm but I will put it 0.3 if I print it, do you have some idea what to use for floor?
p.s. just figured out there is plexiglass laser cutter near me I think they have 0.15 cm thick plexiglass 0.3 they definetly have
Hi there. IMHO snap fit features are good for prototyping injection molded parts, but if your part if going to be 3D printed only then there are other methods that are more suited.
Do you need to be able to dissemble the parts ? If not, then a lip/groove feature and some glue will work best. You can use the resin itself and polymerize it with a 450nm laser pen (cheap on Ebay) before the part is cured (best results this way). Or glue that parts together after curing with some cyanoacrylate (only if there is no gap between the parts) or 2 component epoxy… I found that gluing after curing with the resin only doesn’t yield very good results.
1 Like
IMHO it’s not the best idea to print buildings with the F2.
There are a lot of problems with warping surfaces, wavy edges, dimensional accuracy and so on. It’s hard to print large thin and flat parts like walls. Think about milling the walls from plastic sheets and print only special detailed parts.
All buildings at the picture below are printed with the F2 (Black V2 and V3). The house on the left f filled the complete building space of the F2. The buildings on the right should be in a line, but the walls warped…

2 Likes
my walls are separated in segments each level so 30x300 cm in 1:100 is 0.3x3 cm and my floor I am planing to use plexiglass guess that can help ?
p.s. can you give me link of your work
Sounds like some kind of a puzzle
Make sure, that the wall parts are min 1.0 mm thick.
I’m specialized in model tramways. You can see some of my trams and buildings here (not all models are my work):
1 Like
I know warping of thin flat parts is prevalent with thermoset plastics, especially if they’ve been de-molded before being completely cooled; but I’m wondering why this happens with UV cured resins.
I have a few name plaques that I’ve made that are approximately 80mm x 20mm or 30mm x 3mm. They print up just fine; but warp over time. Would painting them as soon as possible after printing to minimize or eliminate additional UV light absorption solve this problem?
SLA parts have internal forces similar to those of molded (or especially FDM printed) thermoplastics. Orientation plays a large roll in warping and angling parts is one of the most effective methods of cutting down on warping.
After parts have been fully post-cured, they won’t warp further. Post-curing on supports can help in mitigating warping during the post-cure process.
1 Like
Thanks for the reply Frew.
I always post cure with the supports and raft still attached, and I still have encountered warping. I always start my orientation, support generation, and layout with what Preform thinks is best. I usually end up tweaking the model in Preform depending on detail locations and final use of the model.
Is the warping tied to the peeling process during printing?
So far the warping is just a minor annoyance; but it would be the pits if it continues indefinitely and ultimately ruining a finished model.
The warping happens after printing, I’ve printed some very thin long parts that turn out OK as long as you have enough supports to keep it stable as it prints. But after printing it can be very difficult to keep things from warping, the larger it is and the thinner/flatter it is the more it can warp.
1 Like
Do I need some googles for this 450nm laser ? Can I use green with different wave lenghth ? Is bigger or smaller wave lenght better? 650nm is red, 532nm is green and blue something about 470 and violet around 400 ?
450nm was a mistake on my part, and I can’t edit the post anymore. Formlabs resin cure at 405nm and as such need a 405nm laser for gluing prints together using the same resin. Still cheap and available on ebay. You will not be able to cure resin with 360 or 450nm lasers, as the resin really is only sensitive to 405nm ± a few nm.
As for goggles, you should use appropriate goggles with any type of laser, that includes 450nm. It is especially necessary with lower wavelength lasers as this kind of light tends to be absorbed by parts of our eye which can’t be corrected / replaced and as such damage is permanent… which doesn’t mean you should not protect yourself with other types of laser.
green laser once hit me in the eye for half second maybe second, I had pain in my brain. Didnt had any problem but have small dioptry over the years of using computer I guess, but now in last 2 years problem is getting to be bigger. Do you have something to reccomend for googles? This 405 nm laser when it hit white resin it will definitely shatter all around room so I guess googles or some type of lenses is must.
Most of the energy from the laser will be absorbed by the resin, and the rest will be so diffuse that risks are very low. 99% of the risks using lasers is direct exposure or through a reflection in a mirror or through another lense.
If you look around there are a lot of 405nm goggles, they usually have orange colored glass.
1 Like