I know it’s not much compared to a lot of the stuff posted here, but here’s my Form-powered pet project:
Yes, it’s yet another Iron Man arc reactor (Mk I/II) thingamajig.
The idea is to make it a tad more detailed and less-junky looking than the garden variety ones, though, and wearable at the same time. There’s room for an Arduino Pro Mini inside, and a bunch of individually addressable smd-packaged RGB LEDs inside. Theoretically, it could fit a li-ion battery too, but i’ve decided to deepen the front and thin the whole package down so the battery will end up being external.
I’m printing the parts bit by bit, as i catch free time from work. This is where i’m at at the moment:
Once i get at least the transparent ring and the top casing printed, i’ll test-fit the parts and, if it pans out, throw some metallic finish onto these.
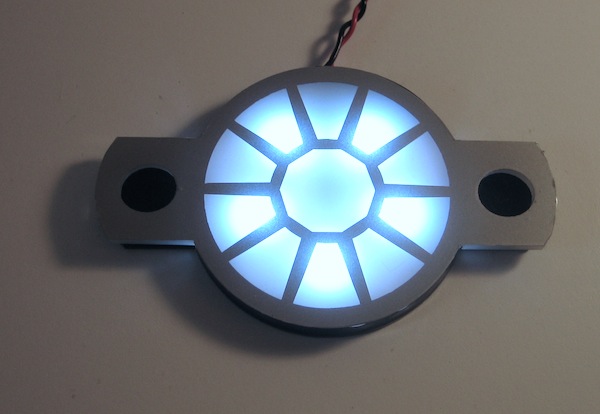
Yeah, i liked that hex mesh… I was playing with something similar and noticed that, when you make a domed mesh and backlight it, it gets this interesting effect where the center appears dimmer than the periphery when you look at it at an oblique angle. Kind of liked that and wanted to see how it’d look in this case.
Successfully printed the transparent ring, although it turned a bit rough. I plan on clear-coating it anyways, so it doesn’t matter. Took me 3 tries before i managed to get the support sorted out so it doesn’t deform during printing.
Now i’ve hit a roadblock with the transparent part that goes underneath it (the one that will hold all the LEDs). I printed one at 0.2mm a while ago, as a test, and it printed fine (but was deformed at the bottom - i did that draft print just to figure out the supports).
My recent attempts were all failures, however, with bizarre skins (not flakes, full-on skins) hanging off the back side. They’d eventually stick to the PDMS and cause a failure (usually near the very end). The weird part is - the skins weren’t delaminated parts of the print - the print itself was more or less okay, apart from the ruined surface and the final failure.
I’ll post some shots of that when it dries off.
In the meantime, here’s an exploded view of the model.
Nice work @Ante_Vukorepa! I built my own arch reactor a few years ago, but your attention to detail makes mine look like it was built in cave, in afghanistan, out of scraps.
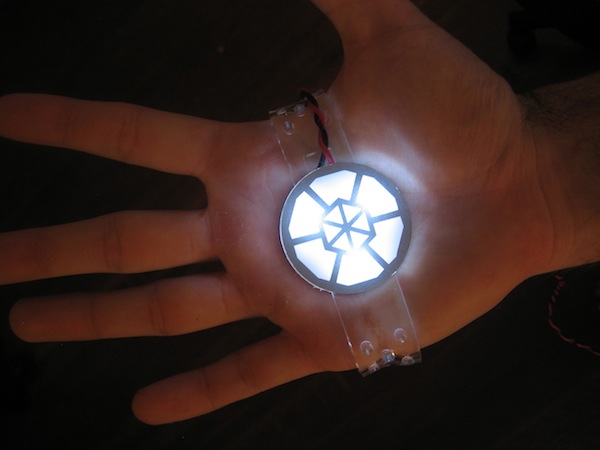
If this is turning into a show-us-your-arc-reactor thread, here’s my reactor + repulsor from a few years back
(with an emphasis on a very thin design, so it wouldn’t look too lumpy under clothing):
Hah! I love yours!
Actually had it fav’d and collected at thingiverse for a while now, but never got around to printing it.
And it most definitely doesn’t look like it was built out of scraps
Nice work
Although i draw the line at MkII-like designs. I like 'em looking more EE than future alien tech.
Was the strap printed?
The first one i did (from someone else’s design off of thingiverse, not mine) was actually mounted through a hole in a shirt. It was on a whim, before a sci fi convention, 3 years or so ago. I decided to keep it exposed like that to get people talking about 3D printing (because they’d usually ask how it was made).
Having it poke through a shirt has the additional bonus of obscuring the actual thickness of the casing - it looks more “embedded” (if that makes sense).
This is what it looked like (what was henceforth known as “the arctrooper look”):
Nope, I bought a replacement strap for a chest-mounted heartrate monitor. The tabs on the side of the reactor are designed to connect to the strap’s clips.
(so the part actually has no 3D printed parts at all; my excuse is that this was before I started working at Formlabs )
Well, then, what better excuse to make another (3D printed) one now?
Some progress on the build…
The transparent base with the SMD mounts is done. It’s got some bubbles and bubble-tunnels, and i chipped off the edge in a few spots when removing the supports (supports attached to sharp edges can do that, even when removing with a knife):
It doesn’t matter much, though, as almost all of it will be covered. I won’t bother with sanding either, but might give it a quick clear acrylic spray-over.
It’s been sanded and i’m waiting for some free time to spray it clear. It’s funny, i originally intended it to be completely clear as per reference, but looking at it sanded, i kinda like the frosted look.
I’ve noticed dimensions are slightly off between the base and the ring along one dimension. Either the ring or the base ended up slightly ellipsoid. Hopefully it’ll still fit the casing once i get around to printing that.
I’ve just realized i forgot to add clearance to the Neopixel mounts to accomodate for the little PCBs they’re mounted on. Back to the drawing board, lol. On the bright side, the ring looks pretty neat with the clear coat on:
Hit a tiny snag with the bottom transparent piece (tried sanding it with a proxxon rotary tool, ended up a disaster, it kept digging into the surface, even at the lowest speed).
Did a paint test on some of the parts. As it turns out, sanding them down to a completely smooth finish requires removing quite a bit of material. The layer lines are much deeper than i’ve expected, especially near the center of solid surfaces. I ended up leaving some of the roughness so it looks like a machined / brushed surface.
I’ve tried Testors Metalizer paints on the parts. Now, nominally, they never bite into the plastic well (they scratch off easily and are meant to be buffed to a final finish), but they really had trouble sticking to resin. I ended up doing a lot of coats, with sanding and buffing in between each two layers and ended up with a pretty thick and better sticking paint layer, but at the cost of some sheen.
The original Titanium paint i used was too bright, as was the Burnt Metal, so for the last coat i mixed Burnt Metal and some Metallic Black, diluted that by about 50% more (Metalizers already come pre-diluted for airbrushing) and misted it onto the prints. Here’s the result:
Not really sure i’m satisfied. On one hand, the shade is exactly what i wanted (greasy and burnt), but the finish looks like metal from some angles / under some lighting, but tilt it right and it looks like plastic again.
If you paint it with Krylon Fusion for plastic on the first coat, that will bond great. Then the second coat can be Testors, and that should bond good to the other paint.
Yeah, heard that somewhere before, unfortunately, no Krylon available locally.
Never tried experimenting with other primers either, as Testores explicitly says not to use a primer before the Metalizers (the suggested workflow is do multiple coats, buff, then seal).