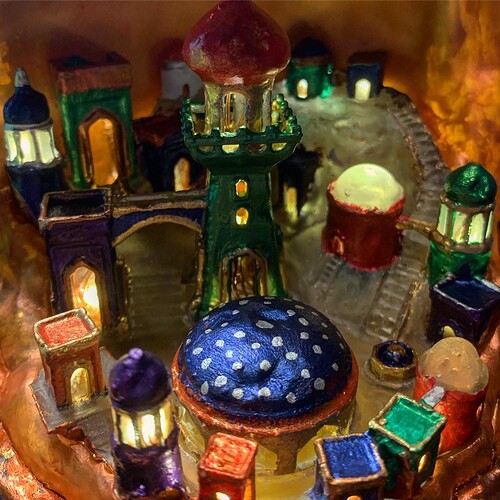
My latest project is this: the Moon City lamp.
https://www.myminifactory.com/object/3d-print-moon-city-multipart-lamp-edition-87610
It printed beautifully in clear resin. I want to preserve some areas of clear resin on the exterior of the ‘city’ as windows and light transmitting areas, but I’ve run into a problem with many of the paints I’ve tried so far - they simply aren’t lightfast. (In other words, there’s tremendous light bleed through the white paint that makes the whole thing look ugly when I run the LEDs- not quite the ‘Mediterranean city’ look I was going for.
Are there any particular model paints that folks could recommend that are nice and lightfast?
Any suggestions on how to best mask the areas I want to keep clear and light transmitting?
Incidentally, I did have some luck on some areas inside the shell with Golden Paints - their metallic bronze was nice and lightfast, and gave a wonderful look as 'metal encased in ice" for the shell’s interior - absolutely breathtaking. It’s just the challenge of finding other paints that go on less thickly for the fine detail areas, yet preserving the ‘glass’ in select areas…
Note: I am by no means an expert. 
Masking first! When masking while working with clear acrylics or resins I have had some excellent results with regular old white elmer’s glue. It generally leaves absolutely no marks, is cheap, and easy to apply/clean up. I haven’t ever used it on FLabs Clear so I would probably test it somewhere less important first. However, if your windows/ desired clear areas need a super crisp line, masking tapes specifically for this would help. I prefer Tamiya tape, which comes in all sorts of sizes and includes a line for curves. That could be rather difficult depending on the size of your prints. With tiny details, laying out a strip of tape onto a piece of cardboard and then exacto-blading out a shape as close as you can and applying it with tweezers is tedious but effective (or I suppose you could try some pre-cut stickers?).
As for opacity/lightfastness, if you are already liking Golden, they have a heavy line as well, but as the name suggests it is thicker. For opacity and lightfastness it usually comes down to pigment more than brand/carrier fluid. Golden (and many other manufacturers) has placed scales or other info on opacity on most products to give you an idea. In my experience, most modeling or miniature paints tend to be quite transparent unless completely unthinned. When doing whites, it tends to be easier to avoid a pure white and go with something a little more pigmented, especially cadmium based (so generally yellow to red).
I can’t point to a specific brand and tell you for sure it will be better, though. I tend to check things on a sample piece to test things out beforehand so that I don’t ruin the piece, but I end up doing it more often than not anyway. 
Ranted a bit, but hope it helps somewhat!
I don’t think there was any ranting whatsoever - the information was amazingly useful in salvaging what I could of the print - and then plotting for the next time I make a similar project. Some mistakes were already made and I’ll just live with them as ‘lessons learned’ for next time. Model paints, like you said, do perform best for applications involving thin layers.
Golden Heavy turns out to be the best I could find for lightfast opacity, and I was able to use that in areas where I just couldn’t get things lightfast before. (Carbon Black and Iridescent Copper turned out to be great lightfast base layers for later additions.)
Once things were nice and lightfast, I used a number of Jacquard Lumiere paints for their nice pearlescent and iridescent sheens. These had previously looked streaky and awful, even atop other layers of paint, but now worked beautifully.
My initial tests of adding the LEDs after using this method were light years apart (no pun intended) from where I started. The first test, the one that upset me enough to post, looked a bit like when you have a bird poo on your windshield and see light shining through it. It was simply terrible. No longer. The paint job is still lumpy from the prior layers I couldn’t quite remove, but, now at least it’s something I don’t want to summarily hurl into a trash can.
When you use the Elmer’s Glue as masking, how do you remove it? Just water?
Many thanks for the advice, by the way. 
Glad things turned out ok! I always channel Bob Ross for “happy little accidents.” As for the glue, if it is something I can fit my mitts into, I peel it off with a fingernail. For smaller bits, tweezers or something work fine. Once it sets it will peel right off and generally leave no residue.
Wouldn’t mind seeing the finished product if you want to share.
Definitely, I’d be happy to share - while I’m not great at painting, the only way to learn is to do, and ask others about how they’ve done things in the past.
The problem with projects like these is that it’s easy to get stuck in a loop of constant tweaking and re-doing, and I’m trying to get to more of a mentality of done > perfect. There’s always a next project to learn from.
It’s not quite done, not quite perfect but I was excited to post the progress so far.
2 Likes


