Yes I was referring to laser flare. Do you think that is taking place, or just over curing?
Some of those cross linking supports are twice the thickness, and the base, all the way around, not just in one direction, didn’t have the little lip that is usually does (that area where you can slide your pry tool under and twist), it was just flat.
Oh my, that stuff is over cured.
What point size did you use? It looks huge! The diameter of the supports should be around 1mm.
Over curing is pretty clear: your vertical supports are thin, as resin will drip off before the next layer. However, uncured resin will stick better to the diagonal supports, if the laser penetrates too deeply, it will cure this resin as well.
What I would try is adding black pigment and then try the Grey V3 setting.
From what I’ve seen it’s important to get any resin tuned in for exposure before we start looking at how good the material is physically. Over cured is almost always very brittle.
Thanks for the tips you guys, I will first try a different resin profile (White or Grey) and if I consistently get over curing than I will start adding black pigment.
Printing Grey V3 Profile as we speak. Will report back in 2-3 hours.
Looks the same to me. Grey and Clear are probably similar laser power settings. I could just iterate through each resin profile, but what do you guys think, start adding pigment, or try a couple more standard profiles?
If it has anything to do with laser flare, it is only a minimal amount. Your prints just look like the resin is way over curing.
Though I can not look at the Form 2 FLP (who knows what the From 2 actually uses…) I think I will have time tonight to look at my new lasers power to tick numbers, obviously have a Form 1+. I can then see which resin has the lowest exposure settings… just looked in my notes from before my laser was replaced. Give Tough V3 a try. If that doesn’t produce any better results, try DentalSG. I can not look at the data for Dental SG for obvious reasons…
So, my logic… My chart has some strange discrepancies and I would have thought clear would have produced better results. Tough seems to be rather reactive but I think I am most interested in the Dental SG results. We all know that Dental was not released on the Form 1 platform due to 2 core reasons (Formlabs, If I am incorrect with any of this, please chime in and correct me. I would hate to lead anyone down the wrong path due to my ignorance…).
The certification for FDA approval is not just resin dependent but hardware dependent as well. It would have been a poor financial decision to certify 2 machines especially where one of them has been discontinued.
This one may be more important for our use. The printers (F1 series and F2) are fundamentally different. I believe the laser power control is more refined and stable and the galvos can track faster making using a Form 1 series printer not feasible. This logic also would apply to Durable resin.
So, I also know (huge assumption as it is 3rd hand information) that Dental SG can be printed on a Slash. The cure times is similar to the Slash standard resin. The “standard” resin didn’t cure as well during Uniz 3rd party testing.
A test with a profile for a resin (that I presume) cures quicker then the standard resins would be a valid test.
After that, if the test is a failure, I would start pigmenting the resin.
Sorry about the long drawn out thought process. Hope it helps.
Brother, I greatly appreciate it. Please elaborate whenever you want, it helps me very much.
I have Tough V3 going through it’s paces right now. About an hour longer print time, which I would have thought meant more time using the laser --> more curing, but we will see. I will try Dental SG next if this one turns out the same. Do you think that adjusting the resolution might change the “overcuring” at all (with the same Clear and Grey resin profiles)? I don’t see why it would, just kind of curious what you thought.
I 100% agree with your thoughts on Dental SG and the Form1+. It has to be a financial decision, and like you said, it wouldn’t make any sense to get that that FDA approval on a machine that was being phased out.
I will post back my results on Tough V3 and Dental SG when they are completed.
What I have seen (no real testing, just observing from experience) the dwell time (after the peel process stops and the print (laser action) begins, is longer with Tough V3 then some of the other resins. If say we add 3 seconds (may be as high as 5) to each layer, it adds up. That is also not taking into account the laser tracking speed which I haven’t fully figured out yet as well as the peel time (in my case). I don’t know how the Form 2 behaves for each resin (well any of them…) but I gather they are similarity different for some of them.
The laser mW and galvo tracking speeds vary from Z layer steps for each resin. I don’t think printing at different Z resolutions will change the results drastically enough to lessen the over exposure you are seeing. If the over exposure was minimal and we were at the point of tweaking, then it might be worth it to test. In this case, it looks like baseball bats are holding your part to the raft so we have a long way to go…
Interesting note though… I opened a ticket with FL just to see if they could point me in the right direction, and the response I received said “The least powerful resin profile you could use would be for our Clear Resin, unfortunately that is the “lowest power” of the options”. I don’t know if I have ever heard someone from FL actually confirm that before, so that is pretty good to know.
Regardless, and because why the hell not, I am printing again with Dental SG settings and will report back with those results.
Sorry the Tough V3 didn’t work. Hopefully you will have better results with the Dental but with the new info from FL, I gather it will not be any better.
All my tests so far with other resins have the best results with Grey V3.
I do not have hard data, but it seems to look like that 0.05mm works better than 0.1mm layers. I read somewhere in this forum that curing is not linear so laser settings can be very different in a non-linear way. I don’t know if the peel speed is different. The high peel speed does cause some issues with the 3rd party resins.
After seeing all your test prints(thanks!!), my hypothesis is still that the laser is penetrating too deeply. You can probably differentiate the laser settings by measuring the supports. Should be 1mm.
I’d definitely try to use black epoxy pigment next. It is over curing too much that I don’t think any other setting works. A full resin tank needed 14 drops of pigment from a wooden skewer(flat end!) on photocentric resin. Try to start with 10 drops.
I agree with the theory of excessive penetration, but the quality seems good otherwise.
For the pigments, on a forum I read about using molibdenum disulfate (ultra-fine grate ~ 1.5 um particles) ad a low settling pigment. I don’t really know where to find epoxy pigment, but I know about the Fun To Do pigments and I tried pigment based printer ink. on my DLP printer the results improved, but still settling on the MakerJuice resin (which apparently has pigment settling issues by itself).
Of this buck-town polymer works I’d be very happy for you and sad for myself… as I suppose it will be pretty much impossible to find in UK.
Anyone tried adding pigment to the Photocentric or the FunToDo?
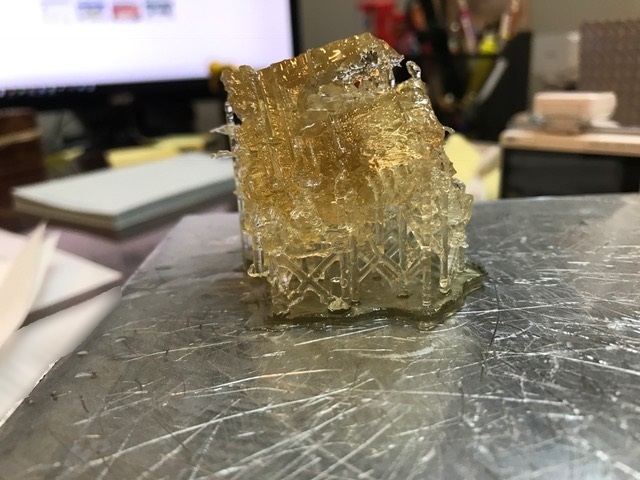
I love this so much. Here are my Dental SG results:
Bucktown Polymer Clear
0.05mm
Dental SG
So many questions. However, the baseball bat supports are gone! I can very clearly see that. I have zero idea why it failed so badly, but regardless, this was an interesting experiment. Additional note, the supports for this print (even though the print failed) where much more familiar, and could be easily ripped off by hand. I think we are getting somewhere to be honest. My next immediate thought was to try Grey V3 or Clear at 0.05mm just for giggles, but I have so much resin it doesn’t matter what I try next, so as advised, I added black pigment (10 drops) to approx. a full tank’s worth of Bucktown Clear and am printing on Grey V3 @ 01.mm as I write. I will be very curious to see how this turns out!
If FL clear is the lowest power setting, why did the supports not achieve the same thickness as it did without Dental SG profile. Maybe there is actually something to be said about laser power and resolution, or at very least, the laser is just smaller and therefore it doesn’t penetrate as far. I’m not sure. Will post back with pigmented Bucktown in 1 hr 30 min.
Yes, the quality of the material seems good as far as you can judge from a picture.
Speed of settling probably depends on particle size and viscosity of the material. I have added pigment to photocentric resin which took ~24hr to settle at the bottom but was mixed very fast. Again, FL did an excellent job as I never have to shake my cartridges.
Molybdenum is a black lubricant, might work. I think the epoxy pigment I have is something like carbon particles.
If this bucktown resin works, then we can think about a european group buy.
Whoa, I love you for sharing your results(even the failures!) and are open for testing different things! It is really helpful for us in understanding the mechanics better.
Dental settings look interesting, the supports are OK, but maybe the laser doesn’t give enough cure time to the material? There are more factors than just power. Galvo speed, layer passes, peel speed, etc.
Thanks so far for testing and looking forward to your results with the pigment!
I think we are really getting somewhere, just some little tweaks perhaps. Cross linking supports are back to thick again, but it doesn’t seem nearly as thick. Supports came off easily, not like fused to the part. Detail on the part looks pretty good IMO. Just for curiosity sake, I am repeating the print at 0.05mm, with the same pigmented resin. If that doesn’t turn out, maybe add some more pigment?
PS I scaled the parts down so I don’t have to wait as long.
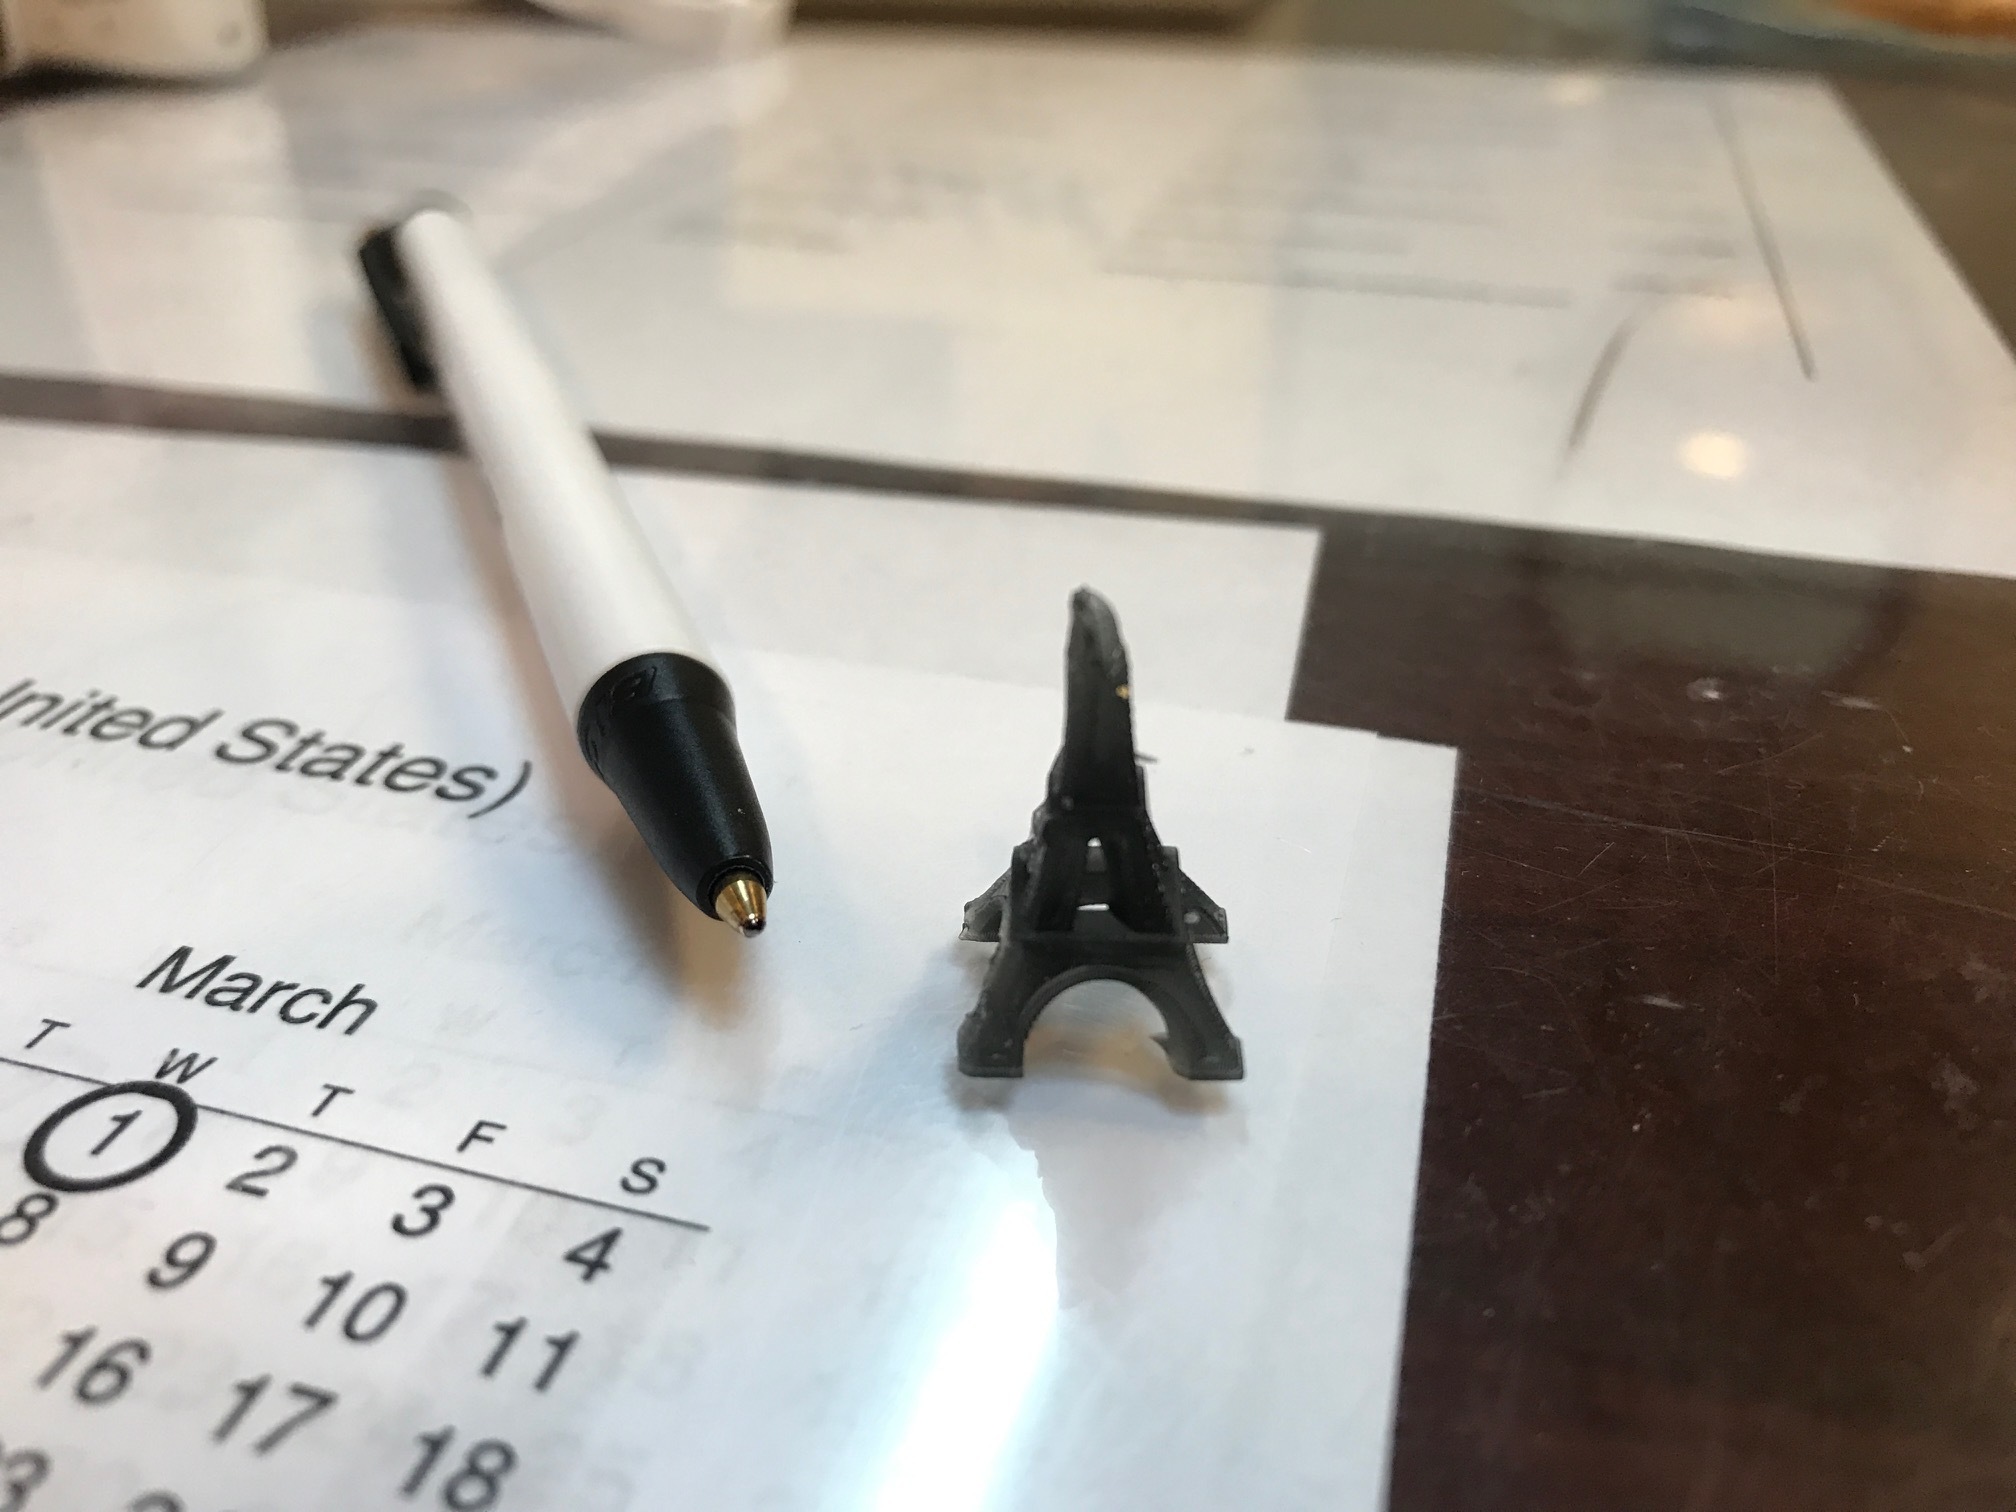
Not flexible at all actually. When it first comes off the printer, I’m assuming due to the exothermic reaction that had been happening in the printer, the part is slightly warm and a little bendy, but NOTHING like Tough is. After it cools, I would say it feels very similar to the original standard resins. Not overly brittle, but if you are too rough on a small detail, it might crack off. For instance, on the Eiffel Tower pictured above, I was very careless ripping off the supports and I broke the top of the tower off, however, the rest of it stayed together, even with some other small features. Where the supports break off, the model looks more scarred than with standard resins though, for what its worth.
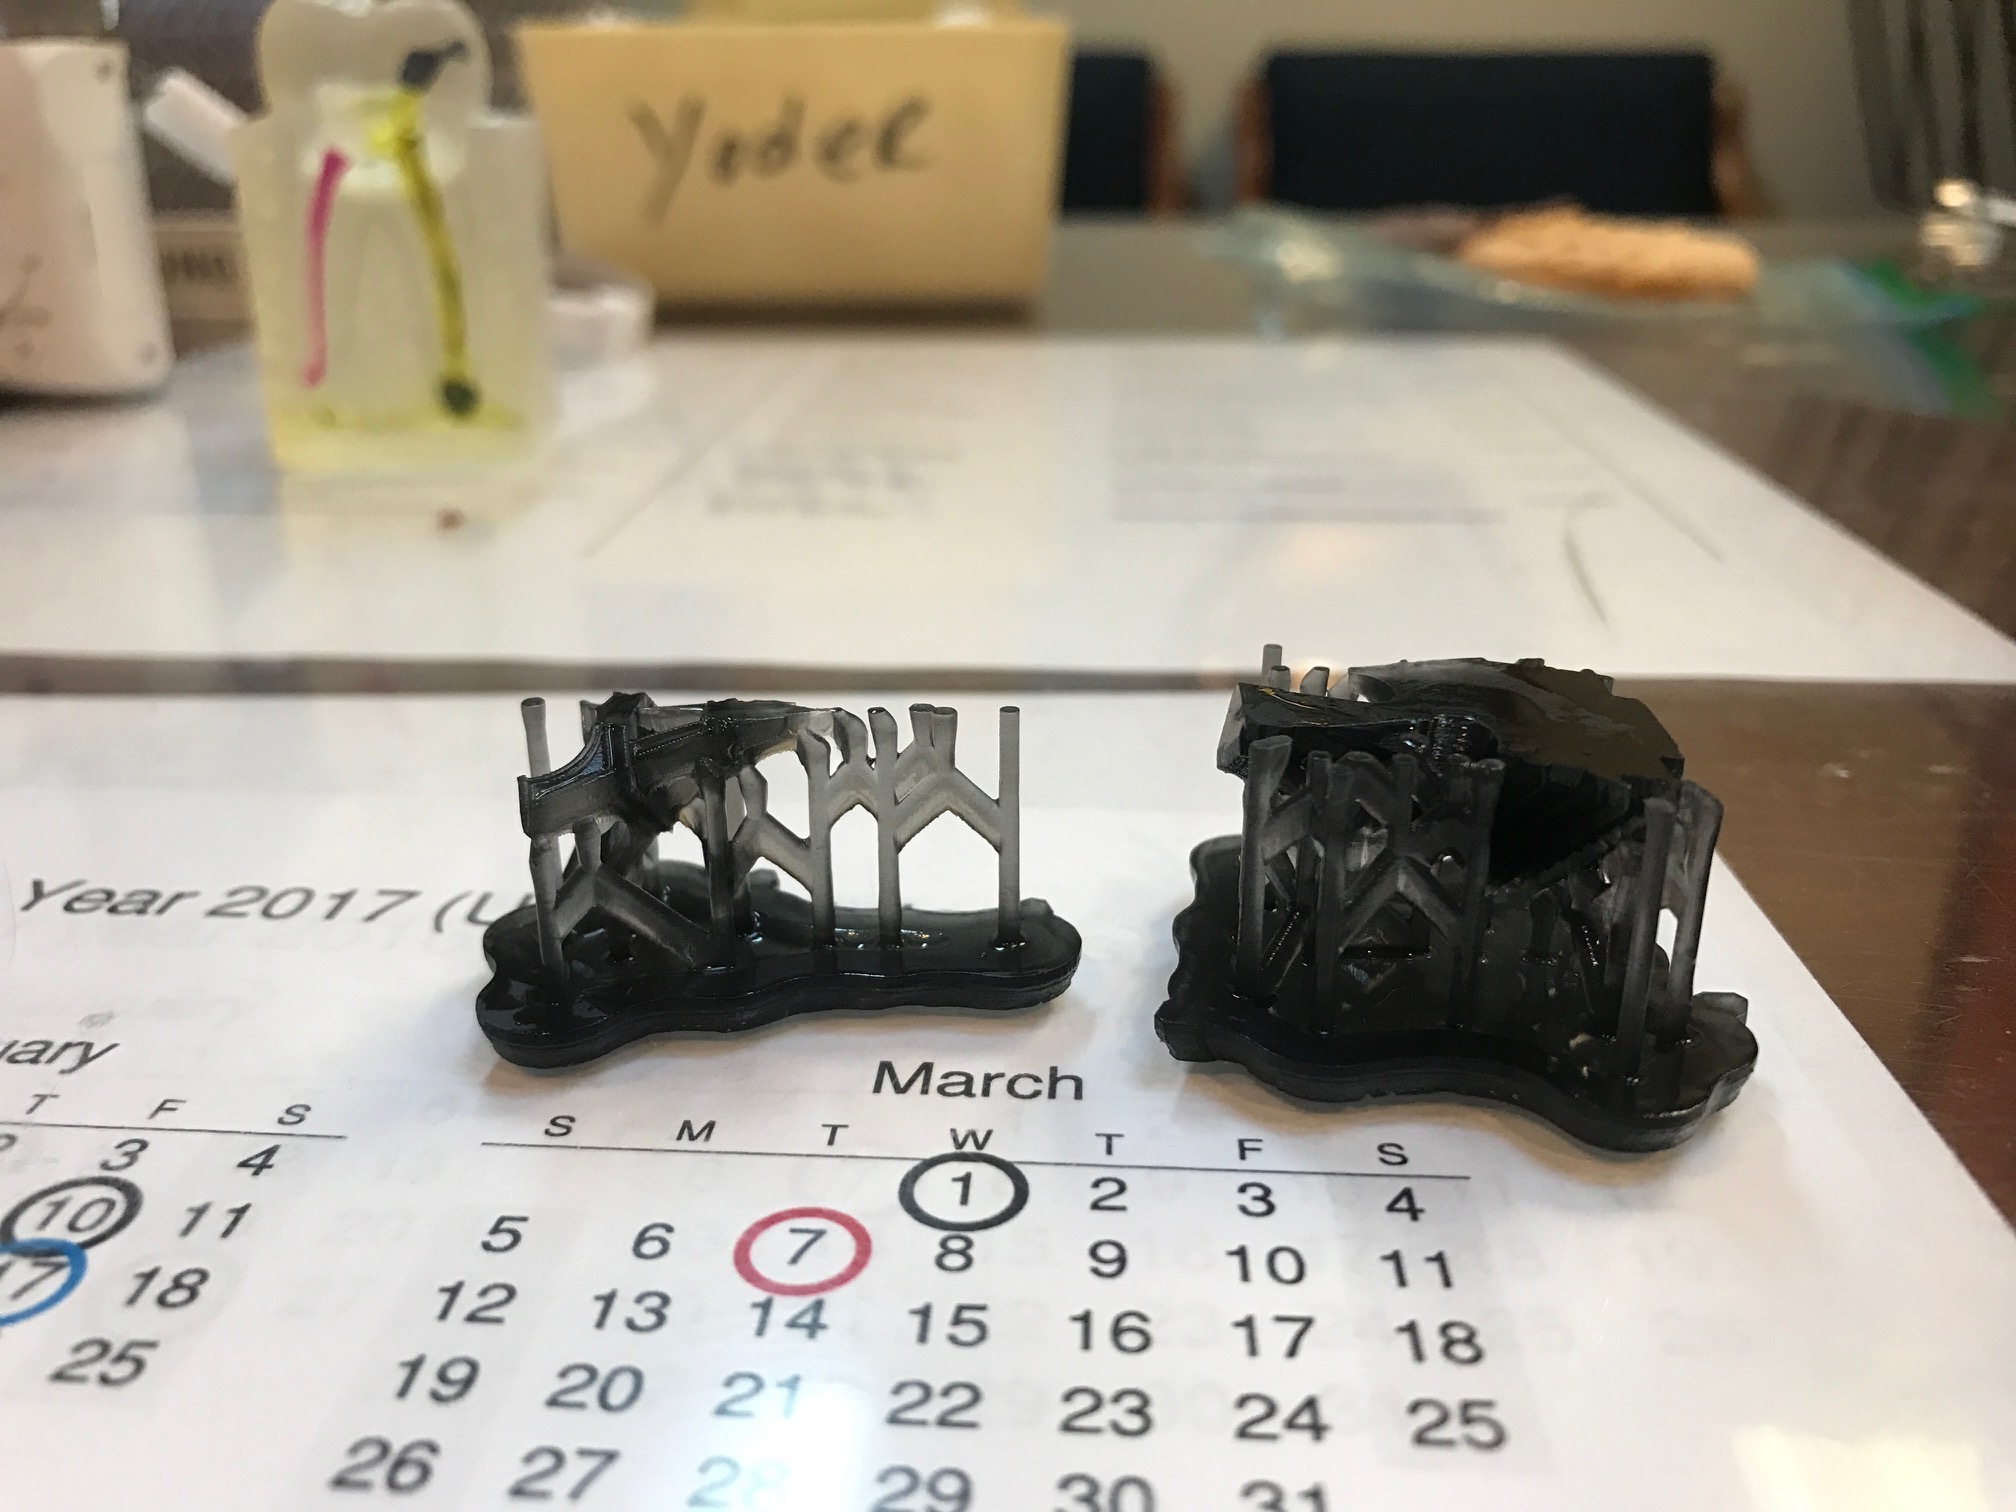
Bucktown Clear with 10 drops of black pigment from FTD
Form2
0.05mm
Point size 0.6mm
Aborted print mid-way, I noticed the supports were still thick. I currently have the same print running again with 20 drops of black FTD pigment @ 0.1mm with Grey V3. Will post back in 1 hr 8 min.