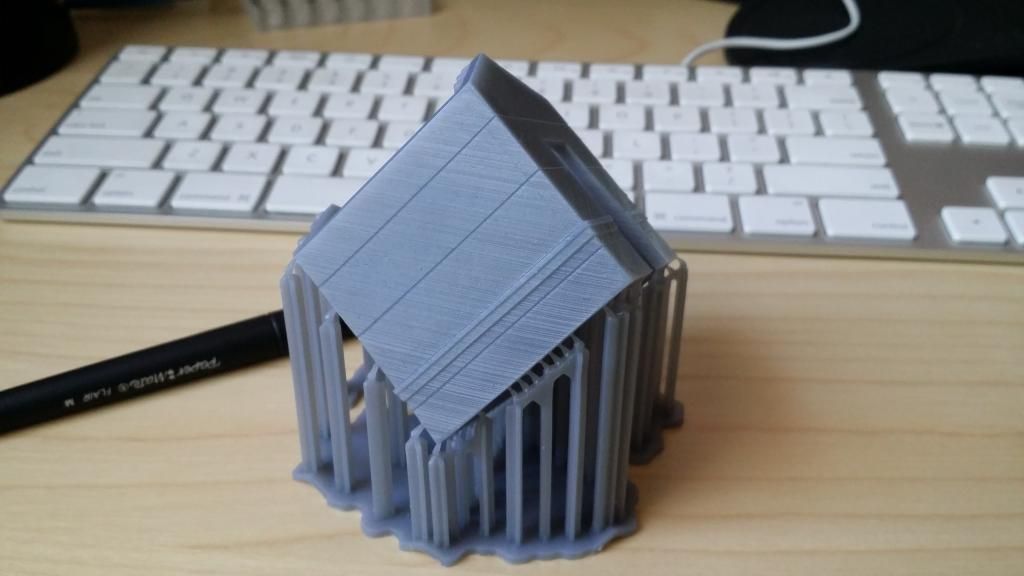
Printing architectural models (My testing)

I got my Form 1+ with the intention to print architectural models. I have had it for a few days (maybe a week or so) since FedEx delivered with damaged packaging - as it currently is, my orange cover need to be replaces as it is cracked. I am waiting on formlabs to send me a replacement, I am sure they will come around sometime.

Despite of that and after exchanging some e-mails with them I decided that I would take a chance and test the machine.
To my surprise, its print pretty well and I am believe that many of the issues I am having at the moment have to do with the learning curve of understanding supports and the overall workflow of my application of the form 1.

Below is my first print of an architectural model to scale.
Explore C R

(redo print).

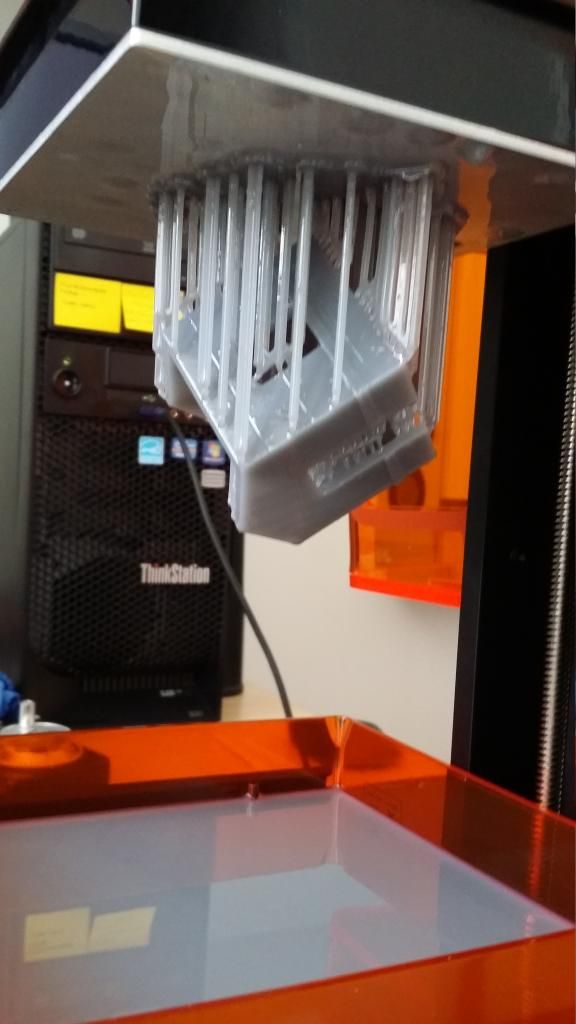
I attempted to print a model of walls, a door and a roof at 1/8" = 1’

I set the “parts” in preform and let the software do the positioning of the models and the generation of support.
I run the print at 0.050 m, in an attempt to a nice crisp model and really see what this machine can do.

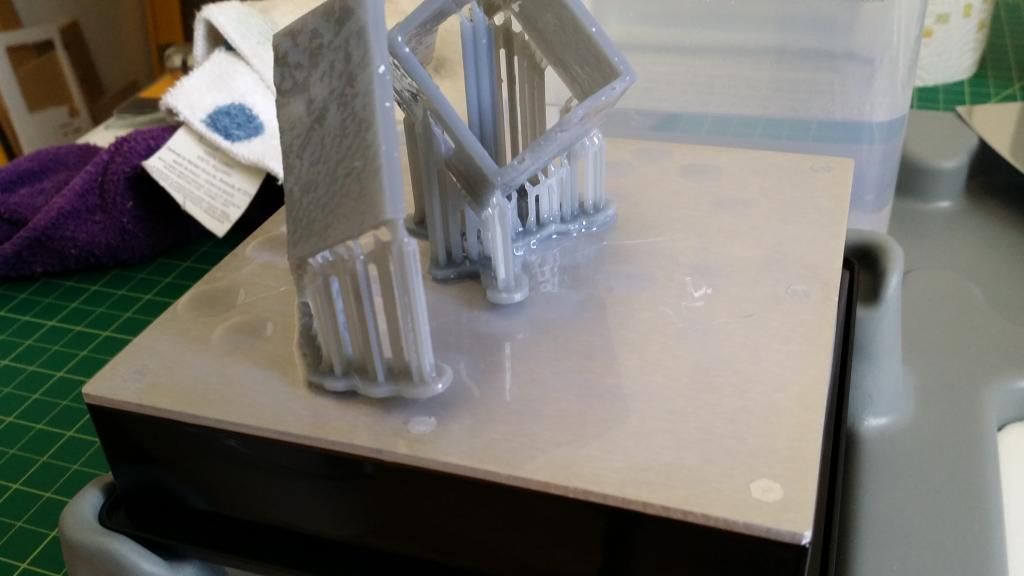
When the print job finished and I removed the platform, I noticed that the door model had not printed, and the base of the other two models had lifted. I am unsure as to what caused this (more on that).
Explore C R

Foreground: rood , background: walls, right: missing door.

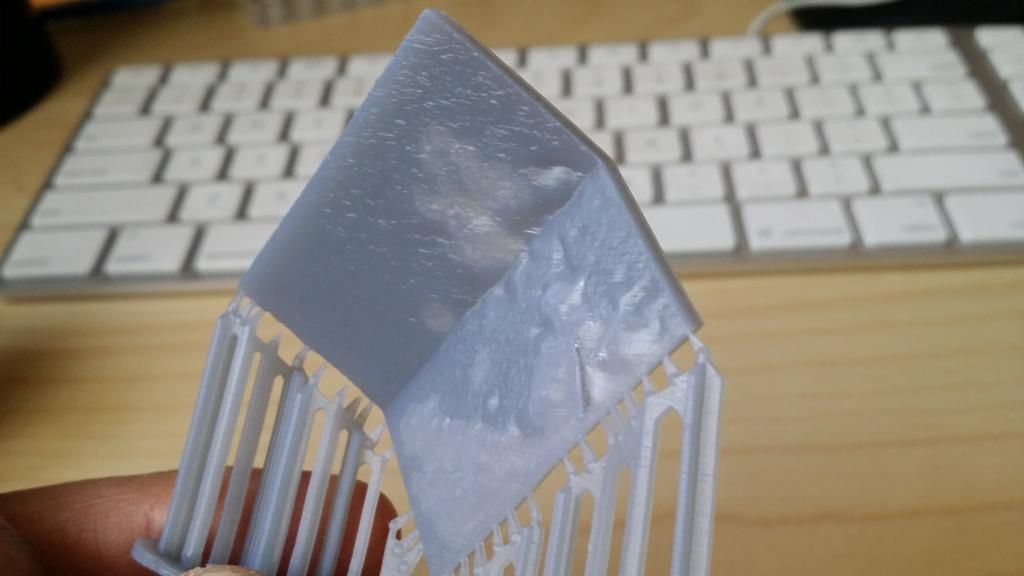
There are also several blowouts and surface imperfections. I am not sure if those are related to the physical size of the printed parts and resolution. Meaning the object is just too small?

See below for the imperfections:

There is the underside of the roof.
The overall geomety is pretty good (not skewed) but the the planes on the inner (top most side when printed) is deformed.
Explore C R

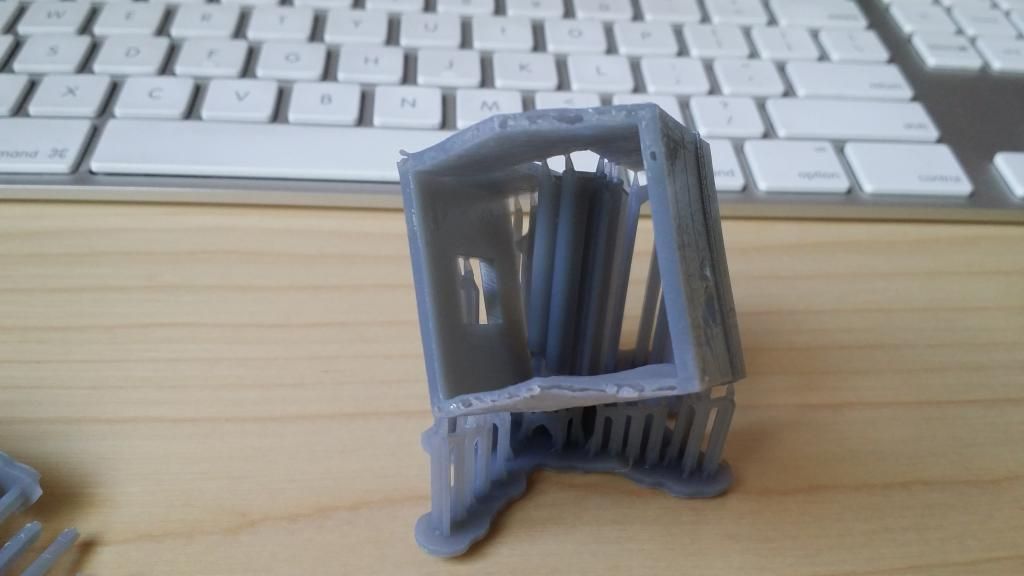
Here is a print of the walls:

The same deformation occurs on the gable end wall which is the top most plane when printed.
This is consistent with the errors of the roof and some minor surface error my second attempt of the part (more on that)
Explore C R

REDO at 0.1 and Larger scale.

From reading other users threads I realized that placing supports manually is an essential step of the workflow (hope formlabs is listening to our suggestions in improving this). So I decided to print the walls models again. This time I scaled a little larger (twice the size of the original) and printed again.

I changed the resolution. I went to 0.10 (original printed at 0.05) and took the time tom add several supports manually.
I did not change settings for the support base thickness.

To my surprise the print came out very well. Much better than when printed at finer resolution. Since I changed more than one element in the workflow, I can’t say for sure what helped. I am going to say that the manually added support did it.

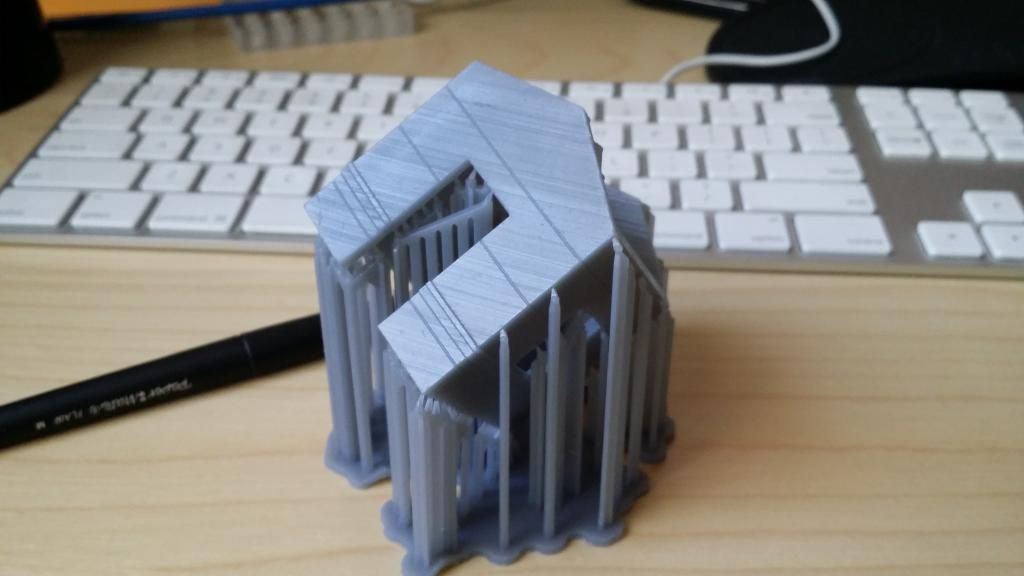
Front facade:
Explore C R

Side:
Explore C R

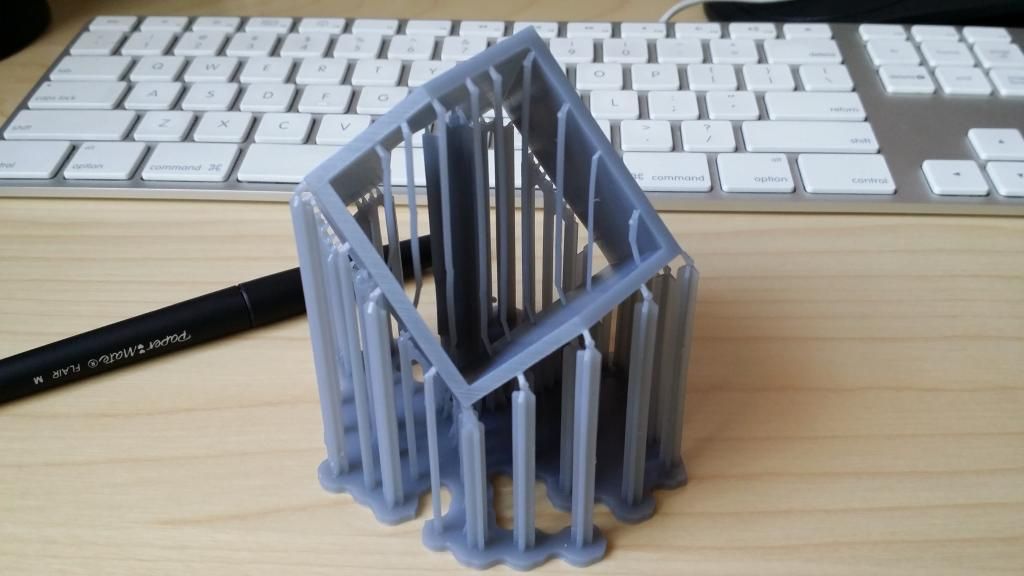
Manually added supports, internal and external.
I believe this helped the most.
Explore C R

The print stayed on the platform all night and I was able to easily remove it by identifying an using the created “quick release” tabs on the base.

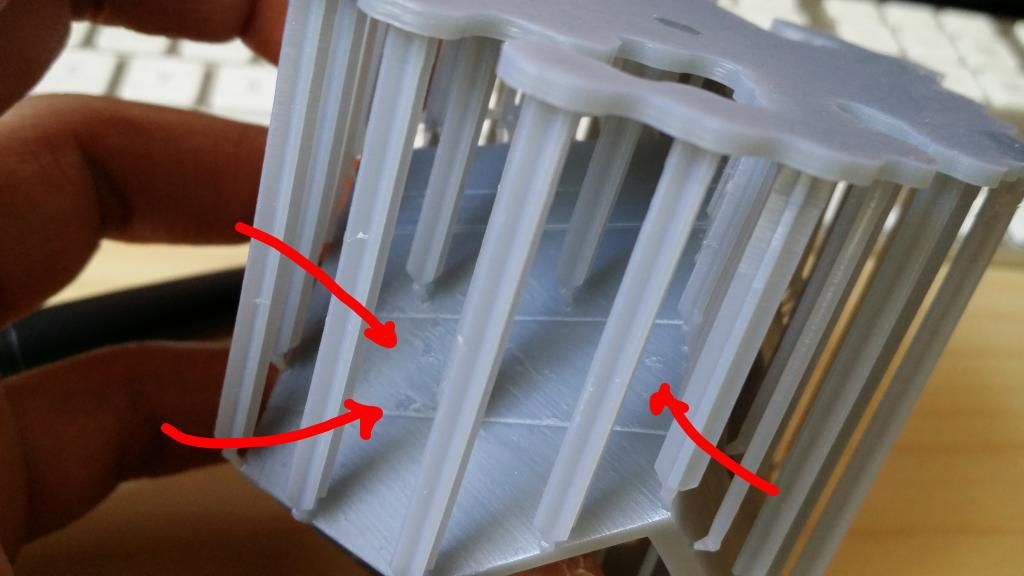
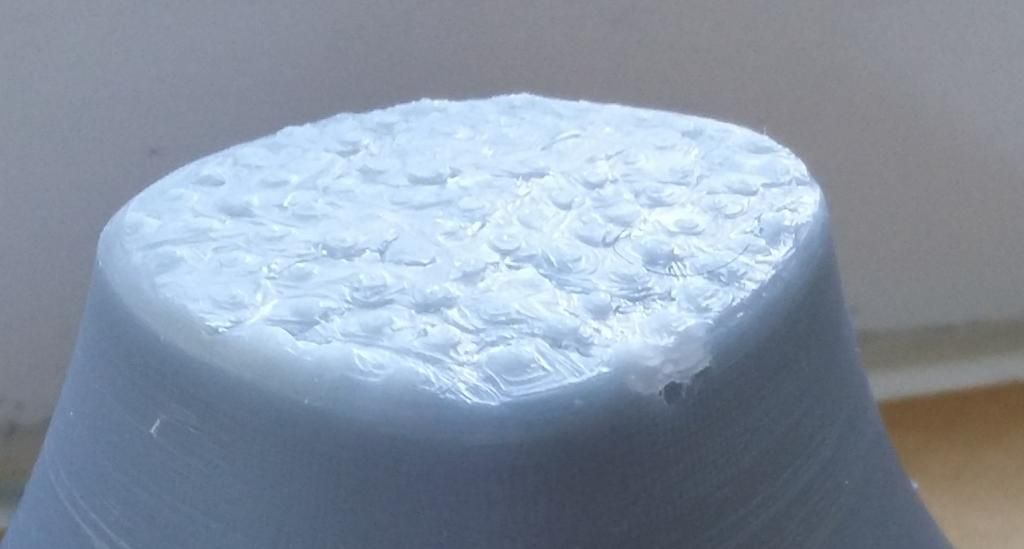
One things that is consistent between the original print and this new one is the imperfection on the planes that are facing up as the machine prints. If you take a look at the image below, you will see small marks as if blowout wanted to start?
I am not sure how to counter this and I wonder if it has to do with the type of resin (grey) or model orientation (mind you the software oriented it this way),
Explore C R

I am please so far with THIS print - although not at the right scale which is important. However I am impressed with the printers ability to produce the detail (again unfortunately no at the scale I wanted) the score lines on the elevations as well as the double step banding around the banding are all there.

I few things I want point out is that I did not top off the resin tank for this print and I am using formlabs resin.
I may print this model again at 0.05 to have an apples to apples comparison and post again.
1 Like

Great stuff Cesar. Thanks for the detail. This is a test project I would like to try as well. I am seeing some similar anomalies on larger flat "walls’ on some of my mechanical parts. I reprinted a few of the problem parts and that ‘bubbling’ went away. I DID print them perfectly vertical, which I assumed would be a good thing since they would be self supporting. But I am starting to wonder if that is a bad thing (I knew horizontal surfaces are bad, but thought maybe vertical was ok. Now I’m less sure). Even so, your angled surfaces had some of that same bubbling at .05.

I may also try some parts at .1 to compare.

Any guesses what the thinnest wall thickness was in your model when you printed the second time scaled up?

Thanks again.

Jeff

I am currently post processing the print at 0.05 m. I iwill post my toughs and images in a few hours, I wish there way a way to cure the resin much quicker. Currently it let them sit for 24 hours by a window. I read somewhere the people are using UV lights? I would like to learn more about that setup.

You asked about the walls. They are 0.11 +/- 0.001 all around. I would say its pretty consistent. However this version is not at any real scale, it looks right.

I will have to try perfectly vertical next. In my case I would have to support the base and I am afraid to get a bad surface similar to my very first part. I could also try to print right on the platform, but get the feeling that it would be very had to remove the model without damaging it.

For reference, this what happened to a flat surface then printed parallel to the platform. Not ideal, so I am inclined to expect something similar under walls of footings.

Explore C R

UPDATE:

So here is a comparison of the same model printed on 0.050.

They look very similar to the naked eye and under some lighting, but the 0.050 layering really captures smaller details much better.

0.1 Left , 0.05 Right

The surface is slighting smoother, but that alone does not justify the time premium. However the score lines and banding are sharper.

Close up 0.050 print. Surface imperfections on the lower left of image. Crisp banding and score lines. Minimal layering.

Here is the same face.

The upper right corner good, but as you move towards the left you can also see some surface texturing.

Here is model orientation as reference (face on left side of image), I am wonder if that has something to do with the texturing.

Reading formlabs resin descriptions it seems like the grey resin being the general purpose resin may just not be adequate for some things. (in my case walls). However white claims:

Our white resin captures smooth surfaces and detail well, making it ideal for presentation-ready pieces and for painting.

In other words to yield greater surface finish. By the same token, if you take a look at Daveido’s Athlete with a Pyhon model, it was printed in clear and seems like a perfect print. But I am also starting to think that there is some heaving post processing going on there.

What I am saying is that the defects I am showing are perhaps normal and part of this technology, and that it is unrealistic to expect a prefect print from the form1+ or even an objet. There will still be some post work to make it showroom perfect ?

I want to print the roof again and see how it goes.

Hi Cesar,

Clark again. Glad to see you have started printing some architectual models. I’ve been asking around the office for more examples and am compiling some pictures that I can hopefully throw up later today or tomorrow. As for some of the issues you’ve had printing, I’ll try to address them.

Often referred to as ‘cure boxes’ some people have either started building boxes with UV lamps built in, or have hacked together a couple of nail salon chambers. Personally, I use the later as everything is already built and wired. It cures parts much more quickly but you have to be careful not let it go too long or the part may overcure and become more brittle.

Because you have doorway in your building, it will allow resin to flow in and out during the peel cycle so printing directly on the platform is certainly doable. You are right to raise the concern that doing so will make removal harder but as long as you can get a razor blade under one corner it should still pop off.

Cheers,
Clark

Clark,

if I understand correctly, If my building was four solid walls w no doors, the resin would not flow in and out from the inner void, and thus the print may fail?

Can you comment on the bubbles or “imperfect” surface?

Precisely. Hollow objects, unless they have some sort of outlet hole near the base, usually end up with some sort of small tear or explosion out one of their sides. This is because during the squish the any resin and/or air inside of hollow is under pressure and looks for a way to equalize, most often by punching a way out through the thinest side. Most prints usually recover, albeit with this small tear/hole.

As for the bubbles on the surface, there are a number of cause which makes it a hard problem to diagnose.

-Lack of resin flow due to orientation/geometry
-Dust on the mirror or bottom of the resin tank(unlikely given the success of your other parts)
-Failure by the layers to properly bond to each other

If you continue to see these issues let us know! This lets us know what problems we have to focus on.

@Clark_Anthony, every print I have made of objects of this nature, ie. planes, exhibit bubbles and abnormalities to the finish.
Very interesting considering the base of support and supports themselves print with such high resolution, smooth surfaces every time.

I do not know it is dust on my mirror but it could be. I can get some canned air and blow in there (if I recall that is how you clean it right?)

what causes layers to not bond. I am willing to share my model with FormLabs for some testing. I know parts need to be cleaned up but as you can see I am getting some pretty bad finishes and I would like to learn based on your teams findings how to improve my prints.

Here is an updated photo of the 1 micron print all cleaned up.

http://s10.photobucket.com/user/Profoxcg/media/20140903_110218_zpsw4puhrvb.jpg.html

unfortunately the one surface can’t be corrected. But the ones that printed right are amazing.

This is another print done in a makerbot at my office at the same resolution. Still nice, but I prefer my form 1.
Need to reprint it in grey or paint it.

http://s10.photobucket.com/user/Profoxcg/media/20140904_095249_zpsfght6b12.jpg.html