I will let those form1+ users that are actually interested in the vat decide whether this vat fits their needs. I welcome suggestions if they have value but suggestions such as wasting a liter of resin to print a solid block is not a suggestion it’s a waste of my time.
@HTL, sorry to say, but your posts are a bit vague and due to this, I would not buy your VAT.
Someone is asking for actual measurements of the parts and your only response is “they are good enough!”. We need data.
It’s easy to print something that looks good on pictures. It’s hard to print something accurate.
As repeated by @DavidRosenfeld, the first 5mm is for adhesion.
I only see claims in this thread without any proof.
- Why is this VAT more durable on a F1/1+ compared to original tanks? Show us wear after n thousand layers.
- What is the accuracy of parts? We need data. What about transmission of UV light through the FEP? It will be different than PDMS. Include proof that you don’t have scatter issues.
- Again: printing these low cross section parts without supports is easy, I can do that with every 3rd party out there and they will come out beautiful. The eiffel tower is too simple and has a too low cross section. The test piece is nice, but again, too low cross section.
I have done very extensive tests with 3rd party resins and even a FEP tray for a Form 2. Problems only pop up if you print large pieces or tall thin walls with supports,
Resin sticks to FEP much worse than PDMS, so you need to print full bed size pieces to find out if you’re not going to damage the machine. This sticking can cause deformation of the FEP or worse, deformation of your parts. It can also cause micro cracks or stress which can cause cracking of the prints later.
TLDR;
Show us proof with data that your FEP VAT is as least as good or better than the FL VAT. Any hobbyist out there can make a VAT like this and print it on 3D hubs for 25 bucks. You are ignoring suggestions from experienced people and tell them their suggestions(and experience!) are not correct and of no value. Don’t. Show us why we should buy your VAT and not design one ourselves and make it open source.
Being this vague only lets us think you are hiding something.
2 Likes
I will run my testing schedule on my terms not yours and I will offer the vat at flexvat.com once I am done and let form1 users decide if it works for them, if you do not wish to purchase my vat you are, of course, welcome not to.
I have been making FEP based vats for a while, and I am quite well known for doing so, that said, I do know a bit about making vats for resin printers. Your opinions are of course your own but if it were as simple as 3d printing a FEP based vat for the form 1 many would have done it before, Since you do not really know anything about either the materials the vat is made of or the underlying architecture of the vat that allows it to work with the the form1 you might not want to go too far down along that particular line of reasoning. You and davidrosenfeld seem to feel that you speak for the entire form1 community I suggest you let them speak for themselves and make their own decisions about the fitness of my vat.
Hiding something. Unbelievable!
Of course there is some 3d printing involved in the production of the vat:
The “thing” printing a mold master for the form 1 vat

Before you start saying that I speak for the community, I DO NOT and I don’t appreciate you putting words in my mouth. Some here would agree with my thoughts, others won’t. As you stated, let them speak for themselves.
You came here to advertise your product,which I happen to see great potential with Unless I missed something, you were looking for feedback. I gave you feedback you didn’t like. Sorry. Formlabs gets feedback from me all the time they don’t always like either.
In my opinion, and ONLY MY OPINION, it would be good for you to show us how accurately your vat can print with FL and non FL resin. You didn’t like my 4"x4"x4" cube. Ok, fair enough offer something else, How about .25"x x.25" x .25". Show us that the resins print accurately or don’t. It is your product and your choice.
Good luck.
-David
2 Likes
Such attitude… We were just trying to help. 
(We were(at least I was) interested in a VAT, but it seems you don’t care and don’t want any customers asking questions who in fact know the machines very well and speaking for myself I work in a high tech engineering company and am very familiar with the used materials and their limitations). You just lost a customer interested in your products!
Anyway, good luck!
2 Likes
![]()
Printing a 4x4x4 solid cube on a F1 wouldn’t be feasible no matter what tank you use because of the peel system and forces requires. You are just asking for a failure. In all practicality, printing solid models is not a good idea for many reasons including wear and tear and premature fogging of pdms, wear and tear on peel motor, risk of cracking the tank, waste of material. I can’t see any reason to print a solid shape unless your making lenses.
As far as failures with 3rd party resins this is usually a bad exposure of the resin. My past experience with MJ resin had 2 issues: IPA caused the surface to craze and parts were incredibly fragile and distorted from the IPA and because the viscosity was so low the pigment would settle too fast on long print times forcing me to print items at lower profiles.
If Josh is reading this, how about making a simple down and dirty Clear resin and let users pigment themselves if they so choose.
Back to the FEP Vat, I think there should be no difference in x,y resolution of the machine and assume that we may have to adjust the z if the FEP film doesn’t fall in exactly the same distance as the FL PDMS layer does. I see how the new VAT is better, better frame material, better design, better film as shown with the MJ red resin print.
You guys are correct on the first compression layers. Why I do not print flat and ALWAYS use supports.
Has anyone tested Solarez clear on any FEP tanks? Wondering if that would be too sticky or hard to use?
Ken
makerjuice SF resin I believe addresses your concerns about pigment settling and problems with cleaning of prints with alcohol and probably even distortion problems (prints are not brittle but they are tough and the resin has prety low shrinkage), The makerjuice sf resin has the consistency of olive oil and my experience is that it can take days for pigment to settle out. After printing a part I drop it in alcohol for a minute or two with some agitation then rinse with water, you can even get by without post processing the prints with uv as the surface of the prints are pretty much fully cured.
You can get clear resin from makerjuice, As a matter of fact I only order clear SF and then use their pigments to pigment the resin to their specifications (3ml per liter for red I found 2ml per liter is a better concentration), also, I only pigment 250ml of resin at a time so i am not committed to a particular pigment concentration for an entire liter. I like to pigment my resin because I have found that you can have very precise control of a prints layer quality by using pigment to control the cure depth of a layer for a particular exposure (see https://flexvat.com/pages/diy-and-technical-information#Exposure%20Testing ).
Solarez, nasty stuff for using with resin printers, smells, cleanup is a nightmare, I bought a pint of it a couple of years ago played with it for a short time put it on the shelf and never looked at it again.
Like I said my experience with the MJ black I had tried, the pigment settled so fast I was unable to print anything reasonably tall. I assume formulations have been greatly improved since then.
Yoderkl has been working on an exposure sheet for OpenFL. Might be good to see the FEP Vat listed there.
1 Like
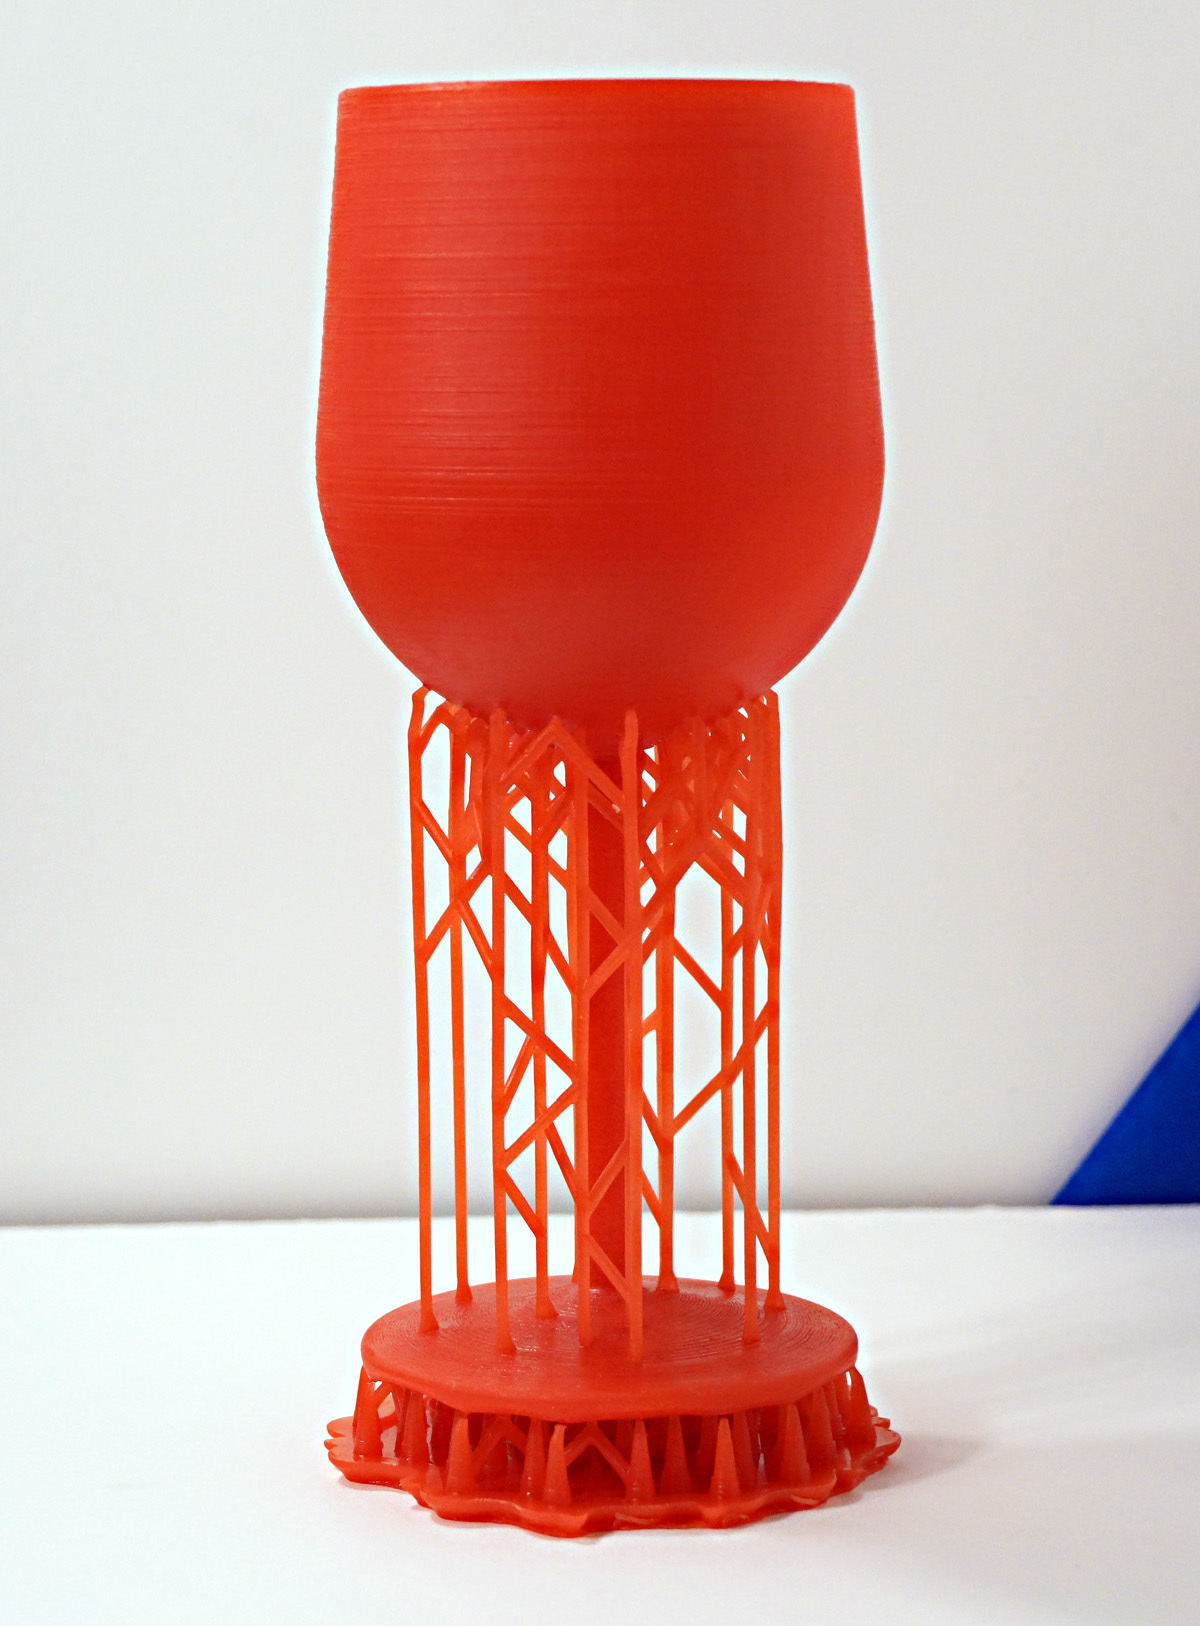
I will setup a web page where i will put project notes, test information, material ini files etc and post a link to it here. I should be able to get to it this weekend. In the meantime here is my latest test print:
The wineglass is 140mm tall without the raft and base supports. It was printed with 0.1mm layers using makerjuice clear resin pigmented with makerjuice red pigment (concentration 2ml/L). I used a slightly modified Form_1+_FLGPCL02_100.ini (clear resin) material file.
The changes in the material file are:
increased modellaserpowermw from 48 to 60 (this wasn’t needed I just wanted to see what would happen)
increased firstlayerpasses from 10 to 20 for better build plate adhesion (FEP film is not affected by very long attachment layer exposures)


1 Like
That is impressive. So FEP can take more of a beating than PDMS with more exposure?
FEP film is transparent teflon, it is nearly impossible to damage it with normal laser or dlp exposures (this includes extremely long build plate attachment exposures). For example, you could have a failure on an overnight print run and simply pop the blob of hardened resin off of the FEP film with a spatula in the morning, the FEP film surface will be undamaged.
FEP film is “stickier” than pdms but can outperform pdms when used in 3d resin printers under certain circumstances. I have been working on a write up that explains how the FEP vat is able to work with the form1, when I have it ready I will post a link to it here.
Technical info: http://www2.dupont.com/KIV/zh_CN/assets/downloads/DuPont_Teflon_FEP_Film_Properties_Bulletin_K26941.pdf
FEP film is very tough: http://projectsinterestsandetcetera.com/#FEP-Strength
30x30x30 cube hollowed with 2mm walls, printed with 0.1 mm layers, same exposure settings as previous test, printed flat with 3-20 laser pass build plate attachment layers


1 Like
Very nice results!
resin tuning
right print is before resin tuning left print is after. Prints are 75mm long printed with .05mm layers

I had a chance to do some tuning of the print exposure and pigment concentrations in the resin I am currently using with the vat. The test prints I was making were somewhat overexposed/underpigmented causing a loss of sharpness in the prints but early on the most important thing I needed to do was to run prints to test the release characteristic of the vat so good enough was good enough. On my dlp printer I actually have a program to help me do resin and exposure tuning (DIY And Technical Information: – flexvat.com) but because of the way the form1+ prints I had to use a different method.
Exposure and pigment concentration testing involves making a single layer exposure in a puddle of resin, doing this tells you two things the hardness of cure and the cure depth. Keep in mind that exposure mostly controls the hardness of cure and the pigment in the resin mostly controls the depth of cure and the depth of cure is what largely controls the sharpness of a print. For example, if you print a model that has horizontal holes and the bottoms of those holes come out flattened it could be overexposure but most likely your resin is underpigmented (you are printing .05mm layers but the cure depth is .25mm and you are continuing to expose already exposed layers when printing). If you seem to have problems with printed layers separating, prints never sticking to the build plate or constant print failures it could be underexposure but most likely your resin is overpigmented (you are printing .05mm layers but the cure depth is .04mm and layers are not sticking together). Resin manufacturers do thier best to make resins with characteristics that will work with the printers they are meant for and the resins generally work fine but standard resin pigment concentrations are always going to be a compromise.
To run a test I remove the printers build plate and vat and use an acrylic platform with a square cutout in the center, a separate acrylic “tray” sits on the platform over the hole and a piece of clear mylar sits on the tray (mylar can be found at office supply or craft stores), I put a puddle of resin on the mylar and make a single layer exposure (I open the printers lid after the exposure to stop printing). I take the mylar sheet with the single layer exposure and clean it using a spray bottle filled with 91% isopropyl alcohol this leaves me with a clean single layer print. If when cleaning the test print the print breaks up your exposure is too low. I cure that single layer with uv then peel the layer off of the mylar and cut it in half with scissors (so I can take a measurement that does not include edges or holes which can be thicker than normal). I then measure the thickness of the layer, if the layer is more than .15mm (for layer thicknesses up to .1mm) I add pigment to the resin, if the layer is less than .1mm I add clear resin to the test resin. Not that on average you can take an exposure that generally works and just play with a resins pigment concentration to control sharpness and eliminate printing problems.
Resin concentrations are going to be a compromise unless you want to mix resin for individual print layer thicknesses. You are shooting for an exposure that gives you a reasonable hardness of cure with a cure depth that does not degrade the sharpness of your print. I like as hard a cure as I can get because that allows me to print pretty extreme overhangs without supports.
Rule of thumb: the cure depth of the resin should not be more than 2 or 3 times the desired layer thickness (for example, with layer thickness of .05mm the cure depth should be no more than .15mm) and never less than the layer thickness
Technical info:
The pigment concentration I settled on (makerjuice sf, 4mL/L red pigment) gives me a single layer print thickness of .13mm, For printing .05mm layer thicknesses I could go down to a single layer thickness of .1 (or even .07 but with the possibility of attachment layer issues). I am still using a pretty high exposure (50) but I have successfully printed models using 30 and I will probably pick up more sharpness by lowering the exposure.
To make the test I use Preform OpenPF with this stl: resin test 1.stl (454.2 KB)
and a custom .ini material file (the file upload here is not allowing me to upload a .ini file so I have uploaded a pdf): form1plus_resin_test.pdf (274.3 KB)
The OpenPF version of Preform can be downloaded from the following links (links are from from the OpenPf Github page):
Mac:
https://s3.amazonaws.com/FormlabsReleases/Release/2.3.3/PreForm_2.3.3_release_OpenFL_build_2.dmg
Note: You can have Preform and Preform OpenPF on the same PC, I rename the OpenPF shortcut (icon) so that I can tell the difference between the Preform and Preform OpenPF programs. I suspect the same can be said for Macs.
The original material file can be found here: OpenFL/Form_1+_FLGPCL02_100.ini at master · Formlabs/OpenFL · GitHub
If you are going to work with this type of file you may want to download the notepadd++ text editor: https://notepad-plus-plus.org/ because programs like notepad do not handle this type of file well.
2 Likes
Large Millennium Falcon print of this model: Millennium Falcon by GuntherS - Thingiverse
140mm tall without the supports, took 10 hrs to print with 0.05mm layers, weighs about 86g

I added resin to the vat about 2/3rd the way through the print run and bumped the build plate causing a faint line on the print.


NOTE: The exposure is a bit high, I suspect I could drop modellaserpowermw and modellaserpowermw to as low as 30 and be ok.
printed using makerjuice sf clear pigmented to 4mL/L with modified Preform OpenPF .ini material file (the adjustments I made to the .ini file are below):
[perimeter]
basexyfeedrate = 600 ; Laser speed in mm/s for the perimeter of the base (aka raft)
baselaserpowermw = 60 ; Laser power in mW used for the perimeter of the base (aka raft)
modelxyfeedrate = 800 ; Laser speed in mm/s for the perimeter of the model
modellaserpowermw = 50 ; Laser power in mW for the perimeter of the model
supportxyfeedrate = 600 ; Laser speed in mm/s for the perimeter of the supports
supportlaserpowermw = 60 ; Laser power in mW for the perimeter of thesupports
[PrintSettings]
SliceHeight = 0.05
NOTE: I reduced OffsetsNum from 3 to 1, 3 outlines notceably thickened edges
OffsetsNum = 1 ; Number of outlines to draw. min: 0; max: unlimited.
[laserRoutine]
NOTE: FEP film is not affected by long attachment layer exposures, If you want to try this with a pdms vat use a junk one first.
firstlayerpasses = 40 ; The number of laser passes to do for layer 0 to attach to the build platform.
otherlayerpasses = 1 ; The number of laser passes to do for most layers (typically 1).
NOTE: dont really need earlylayerpasses, I will sometimes set this to the same as firstlayerpasses and set
earlytimesexpose to 3 to generate 3 attachment layers (the form1+ counts the first layer as one of these layers)
earlylayerpasses = 1 ; The number of laser passes to do for early layers as defined by earlytimesexpose.
[fill]
basexyfeedrate = 800 ; Laser speed in mm/s used for filling the base (aka raft)
baselaserpowermw = 60 ; Laser power in mW used for filling the base (aka raft)
modelxyfeedrate = 1550 ; Laser speed in mm/s used for filling the model
modellaserpowermw = 50 ; Laser power in mW for the model
supportxyfeedrate = 1500 ; Laser speed in mm/s used for filling supports
supportlaserpowermw = 60 ; Laser power in mW for filling supports.
1 Like
Very impressive work. Although I own a Form 2, I enjoyed the pictures and loved the idea. I wonder if Formlabs will be doing more research regarding their vats since they are an added cost that should be decreased to be competitive (well, same thing could be said about their resins compared with many other brands).
Keep up the good work 
1 Like
BTW, this is how the vat works: http://projectsinterestsandetcetera.com/the-best-of-both-worlds-flexvat-with-raised-edge-vented-acrylic-fep-support-plate/
1 Like
Wow excellent explanation & breakdown. I’m wondering though how long would an FEB vat last in comparison with PDMS?
Forever… not really, but the surface of the FEP film does not degrade or fog like pdms so you end up replacing it when it gets damaged: dented, gouged, stretched out of shape etc. so I will say conservatively 50 - 100 prints but hundreds of prints are not unheard of using FEP film as a release layer. Also. the vat kit will come with either 2 or 4 replacement FEP/gasket sets (1 FEP, 2 gaskets per set), replacement FEP and gasket sets for this sized vat will run about $12.00 - $14.00 per set.