got it solved?
I had even bigger problems to deal with, see here:
I have switched over to a new resin tank but haven’t tried printing any part with long rafts like the ones that failed.
Looks like a new tray did not fix the problem completely:

Hi friend!
I have an accident with my printer and need to clean resin under the tank carrier, and beleive,YES, I took it out.
The good part is that I could clean all mirrors and the resin that was inside the printer eletronics. But now I have to calibrate it, and looking for how to do it, fortunatelly I could find your video.
Is there any update since it was recorded or any tip else?
Thank you so much and hope I can bring my printer back to life.
Luis
Hello Luis,
There is not really an update for “my” method, which is quite time consuming but will get your machine back running.
You might be able to level the carrier this way:
- attach the build platform
- insert a clean tank that you have modified (drill holes where the 4 adjustment screws of the carrier are so you can insert the allen wrench and set the carrier screws through the tank)
- switch to open mode (manual refill)
- keep the squeegee off
- load a file
- hit run
The build platform will go all the way to the tank surface and push it “into place” . Once the laser turns on pull the plug.
(I don’t own a From 2 anymore so I can’t test it myself)
You now should have a level carrier - Insert the allen wrench through the holes in the tank and set the screws.
This will go much faster but it also will “sacrifice” a tank - use and old one for this procedure once you have set the screws, plug in the machine again and press the main button it should reset itself.
I have not tested this but people out there have done similar procedures to level the carrier again quickly. I didn’t think of it back then so I came up with my somewhat complicated procedure.
Hope this works,
Stay healthy, all the best,
Jens
Here’s how I did mine (scroll a little down that first post): Form 2 Heater Cable Repair
But it entailed taking certain measurements before I removed the carrier. I was very careful, and after it was done the results were better than before. Of course if you mess up Formlabs won’t be able to help and will tell you the printer needs to be shipped back to them.
I linked to some posts about tank carrier calibration which may offer additional alternatives (the first of which are this thread and @Jens_Schnabel’s original videos - thanks for those!).
The latest suggestion of just allowing the build platform to lower and calibrating to that is interesting. Would love to hear how it worked out if you do it that way.
Hi Jens!
I’'ll modify a tank with the four drill holes to make these procedure.
The doubts I have here are: To calibrate my Form 2 printer, the tank carrier must be
in place with all screws tight until the end (tank carrier down) or they must be all
the way up (tank carrier will be as up as possible)?
Another doubt is: to calibrate the F2, the build plataform needs to touch the PDMS silicon
in the tank? If so, how much is this touch?
About to sacrifice a tank, I think I can close the four holes and put a new PDMS on it.
I will start this procedure tomorrow and I’ll do everything to bring my printer back to live, I am
so worried about it.
Thank you co much for all of your effort helping me here!
Warmest regards
Luis
Hi Rkagerer,
I didn’t measure the screws turnings before I took it off. Yes, I messed up, and I can not, and I
won’t bring it back to Formlabs because of the unbelievable and so much expensives costs
envolved.
I will do these last suggestion: of just allowing the build platform to lower and calibrating. Just need
to know how to calibrate it. Just make the build plataform reaches the resin tank is enough or how
much they needs to be near, one from the other…
Thank you so much,
Luis
Hello Luis,
Yes that’s out of question to send the machine back for repairs, here in the US it would be a minimum of $800+shipping and that would be inside of the US. Completely nuts for something like that! Worst case scenario you use my original method and you will get the machine back.
I forgot what my basic measurements were - somewhere in the videos I am stating these measurements (I didn’t measure or count screw turns either when I took it apart - this sometimes happens in the heat of the moment).
If you can’t find them (the measurements in the video) take the carrier and set it so it feels to be about centered. Screw the carrier all the way down (counting the turns), then back it out by half the amount of screw turns - this gives you a mid range start. I don’t know how much the build-platform is going to press onto the tank surface (Formlabs never answered me some of these core questions when I asked) it is important that the Build platform pushes against the tank to set it straight. Once you have that position back out the screws then re-tighten them until you feel the spring tension setting (count the turns if possible) Once you have that set, plug in the machine and make a test run.
You can use Formlabs’ Test file - a very good file - or you can make your own simple test file - some people make small pyramids with 2-3 steps others use small cylinders - it doesn’t matter - if you make your own file make the 4 pieces 1cm tall that gives you a definite size when measuring the results. They should be a bit shorter than 1cm because of the first burn layers that will compress those pieces. I don’t know by how much (Formalbs never answered that) Important is that those little pieces measure the same or very close to the same number when you measure them with precision calipers - you will need precision calipers to measure.
If they all measure the same - for example 0.93cm - (if you have a variation of 0.930, 0.928, 0.929, 0.931 within the 4 pieces - that should work - they don’t have to be 100% for the machine to work. That off-set could cause slight part distortion on “Large” parts especially when trying to make tightly fitting parts.
Once you get the first good test-files made - simply go for it and have the machine make a smaller model - let me know how it worked.
Best,
Jens
Hello my friend Jens!
I saw your video again and check the distance you show between the tank carrier and the plataform: it is 214mm. So I set this value on four corners to start with. Did the four holes in the tank, where it finds the screws, and when I did hit print, I saw that the building plataform pushed considerably the tank down.
So I opened the cover and started to regulate the carrier, putting it lower, trying to let it with less pression, did it and ask to “print” again. Less pressure this time, to tell the truth I could see that the plataform was so close to the PDMS in the tank, I think it reached but no pressure. And I don’t know if this is the way how it must be.
I printed the First formlabs optics test, with four retangles with the numbers 1 to 5 each one, with a bridge in the middle, but I deleted it and let only the four corners parts. All of them have 12mm height. I am so happy my friend, because I cleaned twice the galvo mirrors, because in the first time, the swap was with so much IPA and they were clouded! And I did this test before as you can see in the pictures, so much difference!
Now running the second test, I turned the screws down as you can see in the pictures, let’s wait…
Thank so much for all of your help, I would like so much to give you a tight hug!

1 Like
Hello Luis,
glad to hear you got the machine back running in such a short time!
The 214mm I stated was a basic number - no machine is exactly the same so for you having to adjust that number is no surprise.
Yes that cleaning is a real pain (especially in your case), getting everything streak free is nearly impossible I had some “special” techniques that I used, which did not use alcohol as cleaning solution at all.
But the optical path is still a problem zone despite the enclosures.
Very happy you were capable of dialing in the machine yourself - something Formlabs told me at the time was not possible…
Excellent!
All the best,
Jens
Jens,
Now you’ll see the four tests that I did, after trimming almost all screws. The first tests I posted here,
were from before taking out the tank carrier, as original.
The rectangles test files are 12mm tall
I decided to stop here, in the 4th test and show you.
1 Like
Hi Jens,
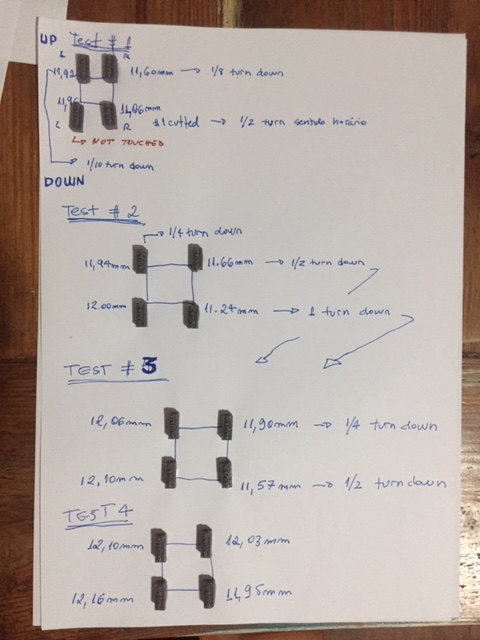
I am pretty satisfied with my calibration process result! If you take a look in the first pic that I posted
here, with a lot of test print towers (with no identification of where the towers corners belongs to).
I printed them before removing the tank carrier, also before the galvano mirrors cleaning process.
Now, comparing them with TEST # 4, I think now, after your calibrating process, it is much better!
Interesting fact that I didn’t trim the left down tower in the tests, and even though the numbers changed:
test # 1 : 11,92mm => and I turned 1/10 down clickwise;
test # 2: 12.00mm => no more trim
test # 3: 12.10mm => no more trim
test # 4: 12.16mm
Now my machine, with the final test # 4 (until now) is with these numbers:
Test # 4:
Tower Up left: 12.10mm
Tower Up Right: 12.03mm
Tower Down left: 12.16mm
Tower down right: 11.95mm
I think it’s calibrated now, what do you think?
Best regards!
Luis
Luis,
Yes, as soon as you move one screw every other corner will be affected since it’s such a short distance from one corner to the other. That’s the actual challenge but I think you should do a real test with what you got now.
The machine is pretty forgiving so you do have some margin. Go for it and have the machine make a real part.
Jens
I printed now one boot from my Black Widow and think the result is pretty good! Now I am
printing the entire legs with the waist to see how it goes.
The printer Is better than before Jens, after all cleaning and calibrate process, I’m sure!
Formlabs told me was not possible help to calibrate without sending it back to them, but
they sent me your thread link teaching how to do it. ![]()
Formlabs must had to teach how calibrate it, even if it could not reach 100% but they must
teach us. The question is: why didn’t they put sticks on the four screws writed:
NEVER TAKE THIS FOUR SCREWS OUT. YOUR PRINTER WILL BE DAMAGED!
Yes, they needs to sell their own resin and these kind of services.
Thank you so much !
Jens!

2 Likes
You are very welcome - I’m glad the video was of any use at all.
The Result looks very good! (Did you model the figure?)
I am surprised that Formlabs sent you this link because they were quite uneasy at the time when I uploaded it. Fearing that people would damage their machines using this video.
I agree a sticker over the adjustment screws - noting, that these must not be turned or re-calibration will be necessary - would have helped. In any case there is always a fix for everything (almost everything).
On the other hand Formlabs has its Form 3 and will stop support for the Form 2 at some point - so I am sure they are happy not having to deal with the “old” machine.
I liked the Form 2 very much - the build volume just got too small for me. The Form 3 is not bigger and despite some pretty clever changes not faster. Tests show it’s actually slower than the Form 2 in many instances. The Form 3L - way too expensive - further, both machines don’t offer open mode forcing one to buy their overpriced resins.
Here in the US the customer service is outstanding - at least as far as I’m concerned - they really try to get you back on the road as quick as possible. Great software as well.
Jens
The model is Black Widow from Mega. She was my inspiration, calibrating my Form 2 ![]()
Well, now a have a brand new Form 2! I won this printer from a friend, that bought and didn’t like
it for his reasons (I don’t know either). It arrived here so dirty and with the orange enclousure with broken
parts. Now all cleaned, enclosure repaired and ready to go!
Hope I can use her for many years!
Best wishes my friend, and thank you so much again!


1 Like
That’s an outstanding sculpt on that Black widow figure.
I did not know you got the Machine for free - even better!
It’s a very good machine.
Also if you ever need to buy a new tank spend the extra money and get the LT tank (the expensive one) it’s far better and will last many liters of resin.
Glad everything worked out and you were able to fix it.
Best wishes back from here and if you have anything you’d like to share regarding the Form 2, you know how you can get a hold of me.
Jens
1 Like
That’s ok Jens!
I am back printing!