It really is a trade off. Open mode is open enough to work great when a quality company like Applylabworks tried to make a good resin aimed at our printers. The trade off is increased volume, faster prints and more ease of use out of the box.
The 100ml refill sucks, but perhaps a simple Arduino powered refill device to pump in fluid based on a photo eye or buoyancy gauge would solve this.
That is if it can detect being a certain degree of full before it pauses or if it just uses 100ml and pauses regardless.
It pauses at the 100ml regardless. Theoretically like I’ve seen it mentioned you could have a robot hand that pushed the button after a certain time to restart the machine. I would just like formlabs to make the simple code say 150ml instead of 100ml lol vs spending money to creste a while other mechanism
2 Likes
Gotcha. I hadn’t done anything in open mode just yet. I’m ok with knowing I need to check on a print after an estimated amount of time to be there to fill it. I don’t like leaving any of my printers going when I leave though. I guess if I’m hitting a button, I might as well fill it. Has this information been posted to the update requests?
Well I finally looked at all of applylabworks profiles all of them use a V1 setting so that really sucks odds of finding a V1 cartridge of any old resin is going to be near impossible
Not sure if it has I honestly haven’t checked. But yeah hitting the button isn’t bad I don’t think anything is going to stop the line the parts get at 100ml unless it doesn’t pause at all
I will follow-up on the request thread because they do seem to implement things from it. I’m waiting to hear about their resin compatibility with tuners and inhibitor from 3DResysn as I believe this will allow us to slow the curing time to meet the new v2-v4 ranges.
Contact the to know if they ship to Europe…
The F1+ Resins from FunToDo ships throughout the world, and are readily available at your local FunToDo Reseller or Distributor . Especially designed for the Formlabs machines.
We have the PDMS-Kit to replace the silicone layer in your Tank when the layer get ‘ghosted’. This way you don’t have to buy a whole new tank, just put a new layer in it!
Our latest blends are the new Dental range, Dentifix-3D. The Low Reactive versions of Dentifix-3D are especially designed for the Formlabs machines. Prices for the F1+ are between €60,- to €70 for 1 Kg.
Happy Printing!
From what I’m seeing the FuntoDo resins aren’t that great for the Form 2 at least. For that reason I have taken them off my list of considerations.
Tuners and inhibitors from 3DResysn will not work to allow use of newer version cartridges with Applylabwork resins. However, they have assured me they have a few new types of resins and are adding more colors to their standard resins.
They are trying figure out how the capacitive level sensor system works to adapt their resins for auto mode on Form 2.
I am pretty sure that there’s a chip on the cartridge that tells the printer what resin it is…so I don’t think it is possible to select other resin type. There will be error message stopping you from printing.
The chip only tells what resin it is and tracks amount used. You select v1 in preform and put the resin the a v1 cartridge and it runs fine.
@Dudemeister how goes printing with ApplyLabWork resins? I’m about to order a couple liters. Any major fails?
1 Like
No failures at all, I’ve done 4 prints with it of different sizes, both at 0.1mm and 0.05mm and they all came out perfect. The detail is excellent and they clean very easily. The vat seems to be clean as well, I don’t see any signs of fogging or ghosting.
As long as you don’t put the model in a UV oven (or expose it to sunlight for a while), the supports are still fairly flexible so you can cut them without shattering. Once I got all the support removed, I put the model in my UV chamber for an hour for final curing.
The only “drawback” if you want to call it that, is that you can’t see very well all the details, since it’s white, so it will require a primer coat before you can actually see what needs to be cleaned or sanded further for final finish. But then again, that would be the case with any type of resin like this, or clear.
I for one an quite happy with this stuff.
2 Likes
Excellent! I like the FL grey V3 for showing off 25 micron details straight out of the printer. I think will will try out both colors.
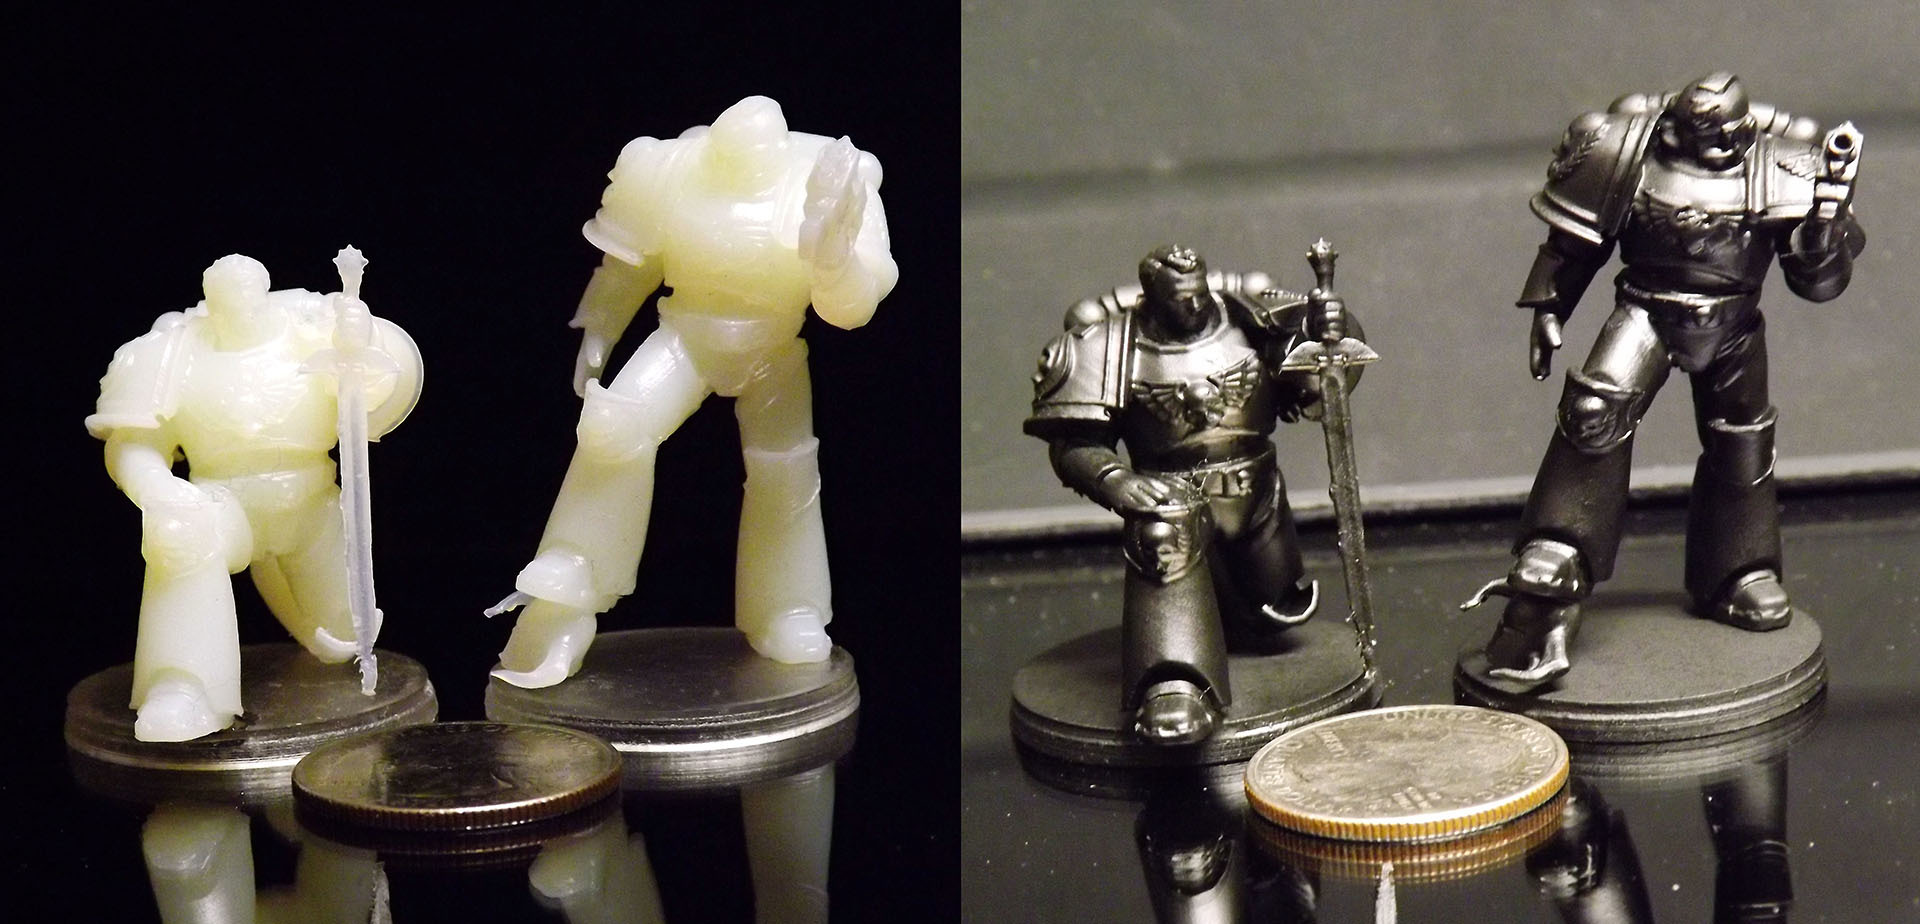
Here are a couple of shots highlighting the amount of detail you can get with this resin. Both models were printed together at 0.05mm. Each of these had the supports removed, but they needed to be primed so I can see where they need further cleanup (not yet done).
The only issue is the sword. I didn’t think to thicken the blade prior to scaling the model down, so it’s literally paper thin, which accounts for the ragged edges and messed up tip.
Also Preform got pretty heavy handed with the supports. Maybe for something this small I’ll reduce the amount of supports, especially those that touch some of the fine surface details, but it’s pretty darn good for the size.
I have another print going right now, of the same models, but this time they’re being printed at much larger scale (1:25). When I have those ready, I’ll post a couple more photos.
.
8 Likes
I just finished printing my first flexible resin print, using ApplyLabWorks Prototype Flex. I printed an iPhone 6 case for my wife, and this stuff is… Interesting to say the least.
This morning I just pulled it off the printer, and it was a pain to remove off the build platform. Because it’s so flexible, it doesn’t “pop off”, I had to work the spatula under the whole thing, but it’s off now, and after about 5-6 minutes in the IPA, it’s now drying off as per instructions. Later this evening, I’ll remove it from the supports and post a couple of pics.
So far, it looks and feels like TPU rubber, very soft and flexible. We’ll see if it’s still as flexible this evening.
Stay tuned.
1 Like
Forgot to mention. There is a slight smell to the Flex resin (a bit stronger and different than the beige), but with the cover closed, it’s not noticeable (at least not to me).
This is much better than the FormLabs flex, which was strong enough to give me headaches. I couldn’t be in the same room with it when it was printing.
2 Likes
glad you were able to try the Formlabs and have a comparison for the flexible. I was wondering if the dry process water soak process for curing was the same
about a year ago, I bought a bottle of flexible so I could print some tires for a fiend’s MiniZ RC cars. I honestly don’t remember what I did at the time, I’m sure I followed whatever instructions there were available.
The only thing I do remember is the smell, and that I got a headache from being in the same room with the printer while it was doing that print. I haven’t used that resin since, and I’m sure it’s expired by now.
This time around I printed a phone case, which in hind sight should have been printed in regular resin. This resin from ALW is very soft, and this open front case is not the right design for it, as it’s not stiff enough to “hug” the phone. I will print a few other thing, but right now I don’t have anything in the pipeline.
So far, after the print, I dunked the model into the IPA for 5-6 minutes, then left it for about 10 hours to air dry. Last night after all the drying time, the model was still sticky and soft enough to roll up, so I washed it in IPA for about 1 minute, which made it a bit less sticky, but not entirely so.
I then put it into my UV chamber for 4 hours, while checking on it every 1/2 hour or so, and it didn’t really change in terms of stiffness. Today, I’ll take it and put it out in sunlight, so I’ll see if the properties change at all.
So in terms of soaking it in water to prevent further curing, I’m not there yet. Maybe I’m doing this all wrong, but so far, this stuff is still soft like a noodle., which is also a byproduct of the model design which large flat thin surface.
BTW, the rough edge facing the camera, was the bottom edge of the model. Printing the model on that edge, rotated 45° on the Z axis was the only way I could fit it on my build platform. Angling it at a 15°/20° off the vertical, produced supports that were more than 3 times the volume of the actual model. The model by itself is a bit over 18ml. With the supports it would have been 78ml. So I opted for a layout where it was standing on it’s side so the overall volume including supports was about 38ml.


Wonderful follow up I’ve done prints with the cure in water and the cure without. results seem the same to me. After about two weeks one part I did finally seems to be dry and less tacky. When I get the cure and the wash then I will really be able to tell